Hummingbirds have to be one of the most elusive and beautiful garden guests you can see. They flitter around from flower to flower with such grace and speed, they’re rare to spot on a regular basis. Since hummingbirds move so incredibly quickly, they need a lot of sugar in their blood to sustain their high metabolisms.
This insatiable thirst is what lures these feathered wonders into gardens and backyards throughout the country. There are plenty of flowering plants you could buy to help ensure these little guys will have a meal, but did you know you could also utilize your own hummingbird feeder?
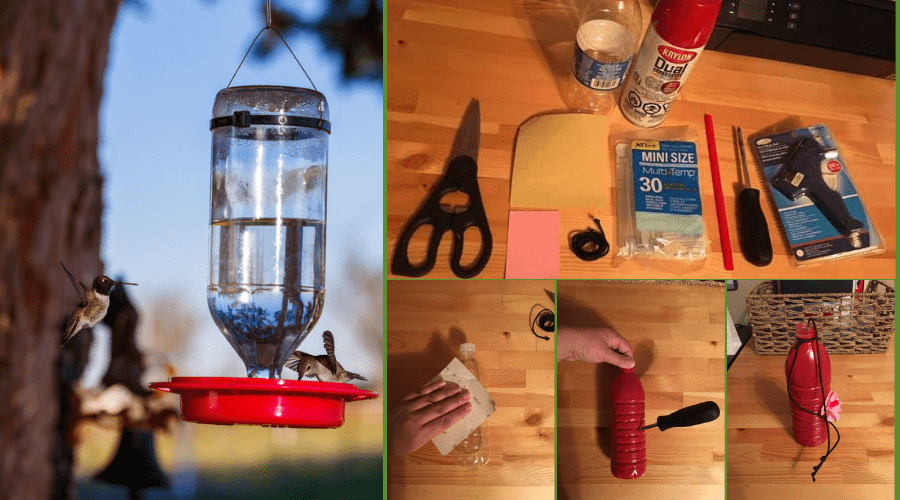
Instead of buying a hummingbird feeder from the store, you could just as easily create your own feeder using simple products. Not only will this little project save you some money (since most of these materials could be found around your house) you will also be creating a sustainable way to help out hummingbirds and draw them to your garden!
WHAT YOU’LL NEED:
You’ll need just a few common items to start creating your very own hummingbird feeder! Read on for materials and instructions.
A PLASTIC BOTTLE

The size of the plastic bottle is really up to you, but the bigger the bottle, the more hummingbird nectar you can make. Anything from a Gatorade bottle to a V8 Bottle will do the trick! Pick a funkier shaped bottle for a more interesting feeder, if you like! Just make sure your container has a screw top.
SANDPAPER, 80 GRIT OR HIGHER

This is pretty self-explanatory, but you do need a higher grade sandpaper for this project. You can easily find this kind of sandpaper in any hobby store or home store that sells wood.
SPRAY PAINT

This one is optional, but using red spray paint to decorate can help attract hummingbirds to the feeder. Even if you don’t want to use more red in the project, you can use any types of colors you want. Add some texture or decoration to it by using masking tape to create line designs in the paint. Get as creative as you want! You can also add red embellishments like red jewels or crafters felt.
CRAFTERS FELT OR PAPER

You’re going to want to cut flower shapes for the feeding opening of the bottle, so you can use any colored felt or other type of craft, durable paper for the job. You can also cut out more flowers for decorating the actual bottle, so be creative!
SCISSORS

When using any sharp tool, always use caution and always supervise young children while using scissors. Crafting scissors should do the trick for this project, but you can use sharper scissors based on preference.
GLUE GUN

You can find a glue gun in any crafting store if you don’t have one already at your disposal. Use caution when using a glue gun since they do heat up to extremely high temperatures and can burn anyone using it. Always unplug a glue gun immediately after using so it can cool down.
SCREWDRIVER OR DRILL

Use what you have on hand – either a standard screwdriver or a drill will do the trick for this project. You’ll need this to create the hole in the side of the bottle.
THIN WIRE AND STRING FOR HANGING

These you should have on hand somewhere in your house, but if not, these materials are easily found in any hobby store or retail/grocery store.
PLASTIC STRAW

This will be used to create the feeding tube for your feathered friends. It doesn’t matter the size because you can cut it down. Just make sure it’s at least a few inches long.
STEP-BY-STEP INSTRUCTIONS

Alright! Now that all your materials are gathered, it’s time for crafting! This is a great project to do with kids, whether in a group or individually. This would also make a fun project to do for a kid’s birthday party or even a troop activity during a meeting. Once you see all the beautiful little hummingbirds fluttering around, you’ll be even prouder of your creation!
STEP 1: CLEAN THE BOTTLE

Take your plastic recycled bottle and remove any labels, glue, or other stuff on the surface. Then thoroughly clean the inside with warm water and soap. Let dry so there’s no moisture on the inside.
STEP 2: SAND THE BOTTLE

Next, grab your handy sand paper and give the entire outside a light sand to rough up the surface. This will help the paint stick and adhere to the bottle.
STEP 3: PAINT THE BOTTLE

Get your paint color of choice and head to a well ventilated area. Spray paint the whole bottle and let completely dry before proceeding to the next step. Hint: red is a favorite color of hummingbirds.
STEP 4: HOLE IN SIDE

Using your hand drill or a small utility knife, cut a tiny hole in the side of the bottle about halfway up. Make sure the hole is only large enough to fit the straw through.
STEP 5: INSERT STRAW

Take your straw and insert through the hole on an angle pointing down towards the bottom of the bottle. Make sure it almost touches the bottom. Then, using your hot glue gun, put a small bead of glue around the outside edge so the straw stays in place. Cut the part extending outside so just an inch is left sticking out.
STEP 6: CREATE FLOWER

Next, grab your crafters felt or durable paper and cut out a large flower shape. Then, using your scissors, cut a small hole in the center and place the flow down over the straw so it’s tight against the bottle. You can glue in place to ensure it doesn’t fall off.
STEP 7: FILL WITH SOLUTION

Using the recipe below, make your own hummingbird feeder solution and fill the bottle to just below the straw hole. You can, of course, head to your local shop and grab some pre made solutions.
HOW TO MAKE YOUR OWN HUMMINGBIRD FEEDER LIQUID SOLUTION
YOU WILL NEED:
1 cup of water
¼ cup of white sugar
red food colorant (if you wish. It’s only to attract them)
DIRECTIONS:
On medium heat, mix water and sugar together in a pan on the stove until it appears to be dissolved. Remove from the heat and allow to cool. Add 4-5 drops of red food coloring and add to the feeder. Make more or less depending on the size of the feeder, and make sure to keep the feeder in the range of sight so you can see if you need to refill it.
STEP 8: WRAP WITH WIRE OR STRING AND HANG!

Take your handy dandy wire or string and wrap around the neck of the bottle. Create a loop and use it to hang your feeder where you like! Be patient, it takes time, but soon you should start to see some beautiful hummingbirds coming around!
CONCLUSION
As you can see, it’s super easy making your very own hummingbird feeder! As stated before, you can get as creative as you’d like with this project and watching all the birds flock to your feeder will absolutely be mesmerizing in itself. And check out our tutorial on how to make a simple birdfeeder for your other feathered friends!
The most important part of the project is making sure the hummingbird feeder solution is dispensing from the caps, so make sure liquid is coming out by tipping over to test it before hanging or by sticking your finger in between the flowers.
Once the feeder is hung in your yard, don’t expect a flock of hummingbirds all at once! It may take a few weeks before you notice hummingbirds coming along, or it could be a few days. Either way, it will be totally worth it once these little guys start trying the new drink spot in town.