Have you been sitting in the baking sun this Summer? Are your kids begging you for a pool that you’ll probably never put in? Sure, you could go and buy a sprinkler or you could make it a fun project for you and the kids by turning a recycle pop bottle into one.
I live in the country, and the idea came to me when I was relaxing on the back patio while the kids ran around. It was blistering hot outside and they were bored of the water guns. There was no way I was driving an hour to the nearest store to grab a sprinkler, so I searched online for some fun ideas. That’s where I found this. It’s quick, easy, costs next to nothing (compared to buying a sprinkler for kids), and kept the kids cool for hours.
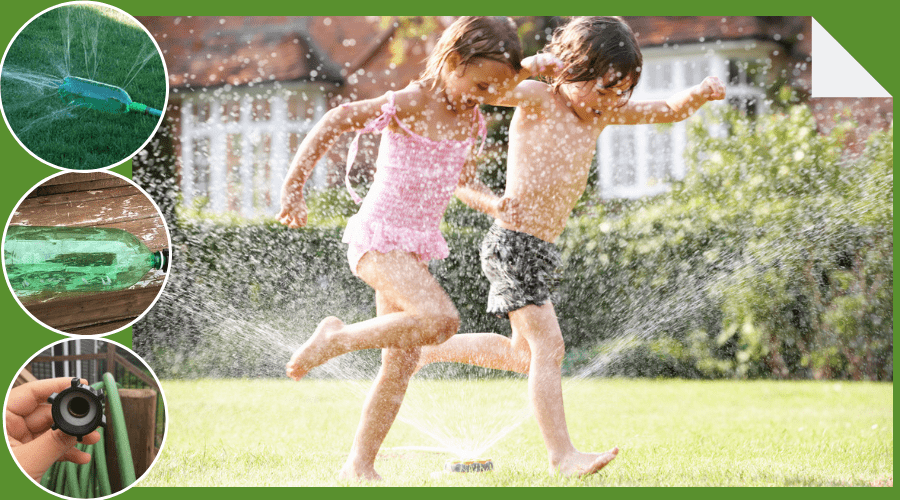
What You Will Need To Make Your Pop Bottle Sprinkler
These are the exact items I used for my version of the pop bottle sprinkler. I found they worked great and I didn’t need to fuss around with special sized fittings and hose accessories. A 1” is what the bottle opening is, so I worked with that.
SUPPLY LIST:
- Standard 1” garden hose
- Connector for a 1” coupling
- 2L pop bottle of any kind
- Tiny screwdriver or pointy tool
ALTERNATIVE:
If you don’t have, or can’t find, a 1” connectors you can try duct taping your pop bottle opening to the hose coupling. This isn’t the ideal situation, but it works as a decent temporary solution.
Step by Step Instructions
As far as DIY tutorials go, this one is pretty easy. Minimal supplies and minimal effort.
Step One: Find a 2L Pop Bottle
We all recycle (right??) so you should have an empty 2L pop bottle on hand. If not, try and look around your house for something with a similar opening. A juice container, cleaner, etc. I used a green 2L bottle with a standard 1” opening, this will fit with most standard garden hose couplings.

Step Two: Clean the Bottle
You don’t want any nasty leftover residue to shower over yourself or your kids, do you? Make sure to empty the bottle of all its contents and then thoroughly clean with soap and water. I even went a little too far and sterilized my bottle in the dishwasher. I don’t recommend this as my bottle came out a little…softer than before. It still worked, but it made the next step a little difficult.

Step Three: Poke Holes in the Bottle
So, if you don’t go crazy and sterilize the bottle, it should be nice and firm. Either way, find yourself a poking device. I used a teeny, tiny screwdriver that I use for putting batteries into the kid’s toys. But anything will do as long as it can effectively poke a hole in a pop bottle.

Step Four: Connect to Hose
Now comes the technical part of this elaborate tutorial. Take your 1” connector and attach it to the end of your standard 1” garden hose. For those of you who already have these things, great. For the rest of you, you can get the connector at any hardware store.
Then take your spiffy make-shift sprinkler and simply screw the opening into the connector. The size and thread should line up perfectly. Mine did.

Alternative
If you couldn’t find the right size, that’s okay. You don’t necessarily need the connector to do this. As long as you hose end and bottle opening are roughly the same size, you can use copious amounts of duct tape to seal them together.

Step Five: Test
Now time to test out your mad DIY skills. The seal between the hose and the bottle should be pretty tight with minimal or no leaking. I mean, it’s a make-shift sprinkler so a bit of leaking is to be expected.
When I turned mine on, there was a tiny bit of water seeping through and I wasn’t getting the pressure through the holes that I wanted. So I grabbed tape and wrapped the joint tightly.

Step Six: Have Fun!
Once you have everything in order, find a good spot in your yard to place it. Set it down on the ground like you would a normal sprinkler and turn on the water. Sit back and watch the kids have fun while keeping cool in this hellish heat.
And if you’re anything like me, you may find yourself testing it out for yourself. It’s load of fun, trust me.

Conclusion
Did you enjoy this tutorial on how to make your very own pop bottle sprinkler? It’s pretty easy, isn’t it? If you’re like me and would rather die in the blistering heat than tackle a trip to the store to buy a real sprinkler, then give it a try!
Feel free to comment and share you own DIY experience with this project. If you had any suggestions to improve the process, let us know! And for more awesome projects, check out these great DIY tutorials.