Living in the country has plenty of perks, one of which is how dark it gets each night. This makes outdoor lighting techniques a fun project to explore, and I’ve been itching to try out a few ideas for quite some time. I finally got enough time to start looking over a few thoughts I bookmarked over the last year to add subtle, fun, and creative lighting that also adds daytime interest to my garden.

One of my favorite ideas that I planned on trying out was tin can solar lights, and after saving cans from various meals over the last few months, and stealing a few from neighbors and friends, I finally felt I had a good enough collection to choose from. These lights took a bit of innovation as I went along, but the end result has been fabulous, and I plan on making many more. Not only were they cheap to make, but they also make really thoughtful gifts you can get your kids involved with as well.
WHAT YOU WILL NEED
Chances are you have the majority of these around, and those that you do not are inexpensive and easy to pick up at a local hardware store.

Power Drill
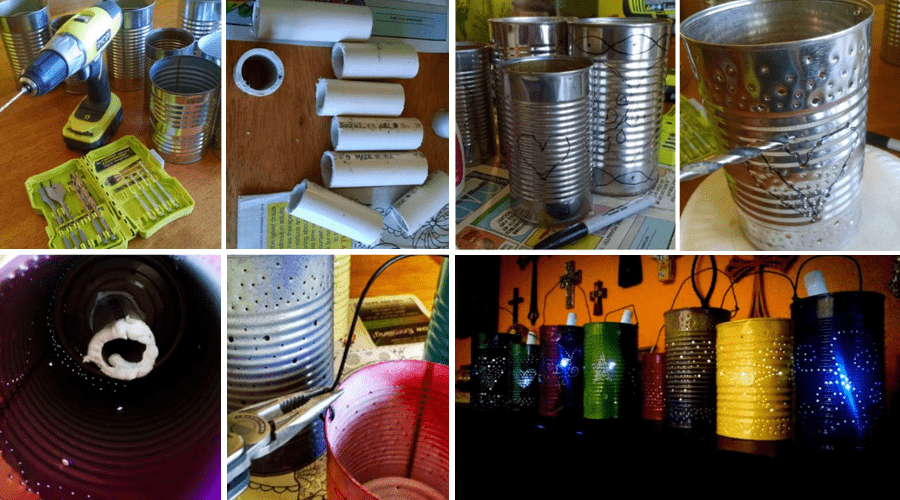
Using a hammer and nail seems a bit archaic to me so I explored ways to quickly munch holes through the really rather soft aluminum cans.
Drill Bit Set

A pointed Brad point wood bit was the perfect size to punch holes, Using metal bits you can widen the holes for handles or to allow more light out.
Thick Gauge Wire
A good thick wire works well for a sturdy handle.
Inexpensive Garden Solar Lights
These lights can be found almost anywhere and almost always cost less than a dollar each. Plus, once they stop working they are easy to replace!
1 to 1 ½ inch PVC Pipe
You’ll need to lift the lights in order for the glow to be seen. PVC is the perfect solution.
Various Sized Tin Cans
Once you get started you’ll want to keep making more!
Spray Paint
You can leave your cans as is, or paint them to match your decor.
Waterproof Caulking
To set the PVC and attach the solar lights securely.
Optional marker and nail polish remover
Drawing your patterns is helpful, and if you screw up nail polish remover takes it right off!
Optional Candles
If you skip the solar light addition, these work great with candles both indoor and out.
GETTING STARTED
I’ll warn you in advance. This gets addicting and takes some time once you get started. The great thing about this is that you can leave it at just about any step and come back to it as you will. It makes for a great ongoing project to get your kids involved or to use for gifting. The lights also look great in the house and work well with candles, both real or electric.
STEP 1: CLEAN AND DRY CANS
Obviously, you will want to both clean and dry your cans well. Stripping off their labels and scrubbing the adhesive is definitely a must if you want any paint to stick as well. I place my cans in the dishwasher after removing the labels and rinsing them to make sure they are well cleaned out. Then I scrub off any leftover adhesive.
WHAT TO REMEMBER
Make sure the labels are removed before placing in the dishwasher, and any loose glue so it doesn’t clog up your machinery.
STEP 2: DRAW ON DESIGNS
I quickly discovered that drawing on my designs was a much more effective method than trying to create from my head. A permanent marker was easy to remove if I made any mistakes, and the lines were easy to perfect over the bumps and ridges of the cans. This way you can get much more detail into your lantern, and also utilize space much more effectively.

WHAT TO REMEMBER
If you paint your can you won’t be able to see the marker lines anyway. If you do decide to leave them as is, then simply use a bit of nail polish to remove the lines as it will wipe clean.
STEP 3: CREATE DRAIN HOLES AND HANDLE HOLES
I made this my first step once I picked up the drill because otherwise I would forget and have to go back to do it. I started a hole with a Brad point bit and then expanded the ones on the bottom and side for handles with a regular metal bit. I found that the metal bit put too much pressure on the aluminum can from the start and would buckle it, but the Brad bit had the perfectly sharp, pointed tip for punching through holes with very little effort. Drain holes are important because if you plan on using these outside, they are eventually going to encounter some water. Rain happens and sprinklers are commonplace in gardens. Aluminum will rust and whether over time, so allowing that water to drain out for it to dry will keep your cans around for a lot longer than it takes for a bottom to rust out.

WHAT TO REMEMBER
How you begin and widen holes really is a personal preference. I used what I had on hand, but I do suggest a pointed bit to at least get started. My method turned out to be very effective however.
STEP 4: DRILL HOLES
Using the same technique to drill as I did above, I traced by designs and filled in my shapes to allow light through. In playing with both lines of holes and more uniform ‘filling’ of designs I discovered that the light shines through both equally well as you will see below. Basically any simple design you can think of with variances in hole shapes, sizes, and density will give you differing effects to enjoy.

WHAT TO REMEMBER
You are using power tools on a smooth, yet rounded surface. Consistent pressure is a must to get a puncture and if you do not keep a firm grip on your tool and go straight in, you can cause the bit to slip. Be mindful of where your hand is, and if you are worried about this step, wearing protective gloves might be a good idea.
STEP 5: PAINT CANS
Once you’ve punched your designs, head outside to paint your cans! I found two good coats with a short dry time between each provided a thick, shiny surface. Since most cans have ridges, make sure to turn upside down to even out the spray and get areas that may have been missed the first time over.

This is a super fun step that you can get creative with layering different colors of paint or creating umbra effects. I bought a few different cans of paint at the store and then mixed and matched shiny and matte finished and splattered on bright colors.

WHAT TO REMEMBER
Paint also helps protect the cans, so feel free to provide a coating to the inside as well, especially if you live in an area that gets a lot of rainfall to keep the eventual rust from occurring too quickly.
STEP 6: ATTACH HANDLE
Even if you want to simply place these lights around your yard, attaching a simple handle completes the look. It also makes it more versatile in case you change your mind. I happened to have a lot of wire sitting around from baling hay, and it happened to be the perfectly thick gauge I was looking for. Just make sure it is attached on well with a pair of pliers so you can twist and turn it to hang it how you want in the future.

WHAT TO REMEMBER
Thin wire, ribbon, or string can also add a rustic touch but may not hold up as well outdoors. If you are planning on keeping them inside then you may not even want a handle, although make sure to create the holes in case you change your mind. Handles are easy to add at any point down the road
STEP 7: MEASURE PVC AND CUT
Most solar lights direct their beam down, and so if you place them in the bottom of these lanterns you won’t be able to see the detail of the designs located above the light. Creating your own light ‘stake’ out of PVC raises the light to where your design can be appreciated, plus makes the solar panel more open to energy collection throughout the day.
I measure out what it would take to get the solar light top just below the rim of the can and then took a saw and cut the PVC to length. When I ran out of battery I used a handsaw. The point is this stuff cuts really easily, is cheap, and nobody is going to see it anyway so this doesn’t have to be perfect, or pretty.

WHAT TO REMEMBER
PVC also provides a very sturdy base for the lights to sit within. You also want something that holds the light well so you can remove the solar tops to replace if you need to in time.
STEP 8: ATTACH PVC AND SOLAR LIGHT HEAD
With an outdoor approved caulk, attach the PVC to the bottom of the can. Try to keep it as centered as possible so the light will shine uniformly. You also want to make sure you don’t cover up your drain holes in case any water collects within the can. Once you have it set where you want, attach your solar light heads to the PVC. I removed the solar tops before I did this so I could pull the little tab that activates the light and screw them back on when I was ready to start using them.


WHAT TO REMEMBER
If your PVC wasn’t cut exactly level, you can use caulk to help level out the light. These lights are very lightweight and caulk is dense enough to build up and hold materials you are attaching it to very securely.
STEP 9: LET DRY 24 HOURS
Caulk takes time to dry, and I suggest at least a 24 hour time period to pass before you go messing with it. It might be extremely tempting to try your lanterns out right away, but unless you are testing out lights and illumination before the caulk dries so you can make adjustments I recommend leaving it alone. Once the caulk is dry you should be able to lift your lantern by the light PVC attachment and screw the solar top on and off with ease.

WHAT TO REMEMBER
Even though caulk is very strong when dry, it’s still a good idea to hold onto the light part of the solar housing if you can when screwing it on and off. The good thing is that it is very easy to fix your lights if the caulk comes loose, but you shouldn’t have to with a little care.
STEP 10: ADD TO YOUR GARDEN
Have fun placing your lights amongst your garden. These lanterns make a great addition to planting pots, hanging from decks, as step lighting, placed within trees or along fence lines, and even under arbors. The sky’s the limit on their placement, so have fun!


WHAT TO REMEMBER
The solar top does need to get either direct or indirect sunlight for the day to produce a good nighttime glow. Placing them in the shade of plants will be fine, but placing them under a decking eve may not work well.
STEP 11: ENJOY!
Once the sun starts to go down it’s time to enjoy the fun lighting your lanterns provide! I placed some in trees, under arbors, and in planters around the garden and their soft illumination is a fun addition to the garden walkways.

WHAT TO REMEMBER
Make sure to place them where they can be enjoyed! They may be cute and eclectic by day, but by night, become a main focal point amongst the soft shadows of your plants.
OTHER IDEAS
These lanterns are great used indoors or outdoors as well with electric candles or even real ones. They provide gentle lighting to decks and tables, and if you make the holes larger you can get even more illumination out of them. Strings of solar lights can also be used and placed within the cans. If you hang them within a tree with a string of lights you have a simple set of unique fairy lights to provide garden lighting interest.
CONCLUSION
Garden lighting adds a finishing touch to your garden to enjoy by night, and even by day depending on what you choose to use. These tin can lanterns are a perfect addition to any landscaping plan as they can be personalized to fit your desired taste in decor. They are also incredibly easy to make and cost almost nothing. Did you enjoy this tutorial? Let us know what you think in the comments below and also tell us how you would use your creations! And as always, please share!