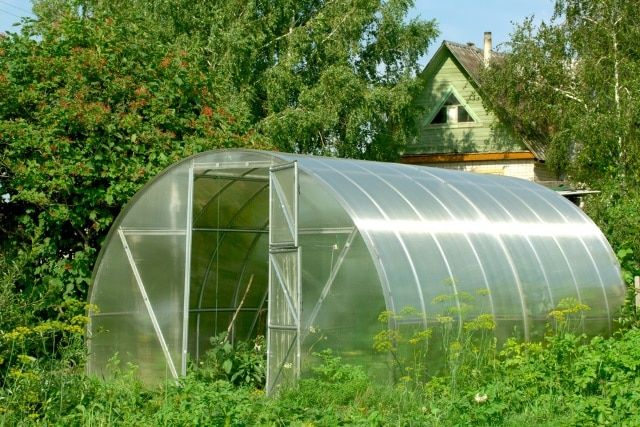
Greenhouses go a long way in extending the growing season, no matter where you live. But then you have to consider several things that could get in the way of having a proper greenhouse. You’ll have to heat it, which requires extra energy and cost, as well as upkeep. And a lot of areas, especially if you live in a homeowner’s association, won’t allow greenhouses because they are tall and call attention away from the uniformity of the neighborhood. However, a cold frame garden is an excellent alternative solution that doesn’t require approval by a neighborhood watchdog, doesn’t need to be heated, and still greatly extends the growing season.
Let’s Jump In
Initially, cold frame gardening was created to supplement the use of heated greenhouses. It is typically built very low to the ground with a transparent roof and protects the plants inside from damaging weather conditions, including heavy rains and extreme cold. A cold garden also helps hold in heat that assists in germination and growth, even when growing conditions aren’t ideal.
Cold Frame vs. Greenhouse
It may seem like a cold garden is very much the same as a greenhouse. While they have some similarities in that they both work to help plants grow and thrive when they normally wouldn’t, they are by no means the same thing. To appreciate the differences, you should first learn exactly how each of these incubators works.
Greenhouses

The idea of a greenhouse is to maintain a certain temperature both during the day and at night that maintains a comfortable environment for the plants it harbors. With ‘cool’ greenhouses, the nighttime temperature stays above 45 degrees, while a ‘hot’ greenhouse maintains that temperature over 55 degrees. In addition, the daytime temperature is set to a very accurate level, depending on what plants are being grown. All of this is essential to the temperature of the roots in the soil to promote growth and germination.
Greenhouses are also used to maintain specific levels of moisture and humidity required by the plants inside, and this is usually a very different level than that of the environment outside. For example, if you want to grow tropical plants in an arid climate such as you find in Arizona, a greenhouse makes this possible.
In addition, greenhouses provide the type and amount of light necessary for plants to thrive outside their normal environment. The tinted glass and the angle of that glass are specifically chosen to assure that the right amount of sunlight from the right direction enters into the greenhouse to properly nurture your plants.
Cold Gardens

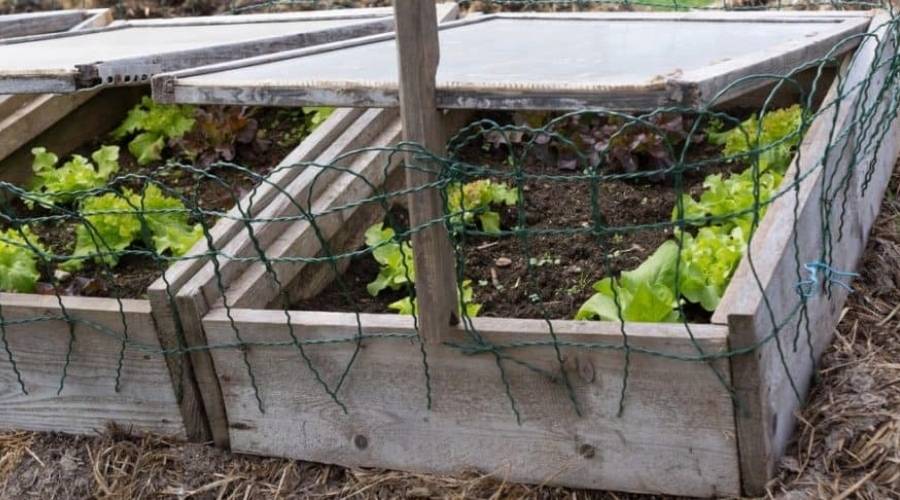
The name of a cold frame garden says it all. One of the biggest differences between this kind of garden and a greenhouse is that a cold garden is not meant to provide a certain level of heat to the plants inside. Rather, the main purpose is to protect seedlings and other plants from intense weather. That can include harsh and heavy rainfall, damaging winds, hail, or freezing temperatures.
Cold gardens are low to the ground and typically made with wood or thick plastic. The glass is clear, and it’s usually placed at an angle that helps guarantee a certain amount of sunlight, which helps increase the temperature inside by a few degrees, which means you can start your growing season early with the use of a cold garden.
This won’t create a year round growing season, and it won’t protect plants in extreme temperature drops without some other form of heat. However, the extra few degrees of warmth can allow you, in a number of climates, to start growing up to a month early or extend growth at least a month at the end of the season.
How to Use a Cold Frame Garden
Because it is a much simpler structure that requires less care, time, and expense, a cold frame is quite popular for use by both amateurs and professionals. In fact, many farmers utilize cold frames so they can grow and harvest food and crops very early in the season, while florists grow roses and other beautiful flowers long past the first freeze using cold frames.
Another advantage of cold gardens is that they are extremely easy to create, making them excellent for those who never seem to have enough space in a greenhouse, as well as those who live in climates where growing season starts later and ends earlier than average.
Uses for a Cold Frame Garden
While you can use a cold frame garden for a vast number of purposes, there are some more common uses that make the most sense.

Overwintering – If you are partial to more tropical plants or those that are a bit tender, you can use a frame like this to keep them through the winter. Consider the zone you’re in and how best to keep these plants. You won’t have growth through the winter, but a cold frame can keep these plants comfortable and dormant until spring when they will readily thrive again. Depending on how cold you expect your winter to be and how tender the plants are, you may want to consider using a sunken cold frame garden to provide some insulation.
If you are going to keep a tender plant in a cold frame through the winter, be sure to cut back the plant as far as you can for it to still be healthy. You may also want to consider putting some of your more tender plants in a container within the cold frame for the winter rather than leaving them in the soil.

Seeding – It doesn’t matter if you want to start your new plants in containers or in the ground. A cold frame garden will allow you to grow seedlings several weeks prior to the start of the growing season so you have a head start. To avoid the shock of transplanting the seeds after they begin to grow, think about using a portable cold frame so you can protect the seedlings where they are.
To assist with the success of seeding, be sure to have your cold frame in place and ready to go about two weeks prior to planting. This will help build the environment you want for the seedlings, with the soil already warmed by a few degrees. Also, realize that this is a crucial time for seedlings, and the soil is much more likely to dry out faster as they acclimate to the location. You’ll want to check the soil more often and will likely need to water more frequently than usual.
Hardening – In most cases, a seedling that has been grown and started to flourish inside a greenhouse needs extensive attention to acclimate to a cooler, less reliable outside temperature. You’ll have to carry it in and out of the greenhouse, leaving it exposed for longer periods each time before returning it, with the process taking as much as three weeks. Putting them in a cold frame garden, where you can simply open and close the glass, is a much less labor-intensive process and takes far less time, typically no more than a week.
Doing this is most successful when you pay close attention to the extended weather report. Because you’ll want to plan for a stretch of several days during which the temperatures are above 35 degrees all day and rain isn’t heavy, it’s important to plan ahead. You should also assure that each of your seedlings has already formed more than a couple of sets of true leaves before hardening.
Extending Life – When plants are thriving, most gardeners dread the coming of the first frost. To keep those plants flourishing longer, up to another six weeks, you can utilize a cold garden. This protects them from the frost and holds in just enough heat to raise the temperature a few degrees so they can continue growing just a bit longer.
How to Build a Cold Frame
Like many things in life, there is no single right way to build a cold frame. In fact, you could use a greenhouse as a cold frame, if you don’t have any heating beyond solar energy. But when it comes to building your own, there are some standard things to keep in mind.
- The cover, or top, of your cold garden needs to be clear to let light through. Consider glass, Plexiglas, or a clear plastic pane such as may be used in a greenhouse panel. A great way to build your cold garden is to use recycled materials. For example, if you have an old storm window, or for larger projects, a sliding glass door or shower door, these are excellent materials to create the top of your cold frame. For a more temporary solution, if you aren’t intending to build a permanent structure, you can stretch plastic over the top of your side supports, or even prop one of your old windows or glass doors at an angle over the plants in question.
- The sides should be sturdy and able to support the top, as well as provide a structure that isn’t going to be easily demolished in bad weather. Again, greenhouse plastic can be used, as can glass, wood, brick, bales of hay, and other similar materials. If you’re using scrap wood, which is often readily available (think old door or table, or pallets from stores), make sure it’s not treated with chemicals that are not earth friendly.
- You don’t have to have a bottom for a cold frame garden. It’s standard practice to simply use soil, which you can supplement with an organic fertilizer or organic potting soil. However, if you want a bottom to your cold frame, make sure it’s constructed in a way that allows for plenty of drainage. You don’t want moisture to gather within this kind of frame.
Best Things to Grow in a Cold Frame Garden
You can literally grow just about anything in a cold garden. This is an opportunity to create a safe haven for plants that would otherwise have difficulty taking seed and germinating. However, there are particular items that are more common and better to consider for your cold frame garden.
For example, vegetables work very well when started early in the season in a frame like this. You can actually sew some seeds in winter, including cabbage, onions, and anything that you can easily transplant into rows as the air warms and the days grow longer.

There are other seedlings that will grow well in advance of spring when using a frame like this, and this could help you have a greater variety of foods in your diet year round.
Try seeding:
- Lettuce
- Kale
- Spinach
- Arugula
- Cabbage/Chinese cabbage
- Broccoli
- Radish
- Beets
- Mustard
- Green onion
Of course, you aren’t limited to what you can grow. However, these are excellent choices for early growth. Because the soil will heat up more than that in the open air, your plants will be surprisingly tolerant of the cold. And once they are thriving, with exterior temperatures warming enough, you can transplant them or move your cold frame so you are ready to plant the next round of items, for which there still may not be warm or dry enough weather.
Cold Gardening Tips for Success
Like all forms of gardening, there is a bit of an art to succeeding at cold gardening. It’s essential to keep a few things in mind, whether you’re just starting to build your frame or you’re maintaining one or more on your property.


- Always face south. You want to make sure you locate your cold frame in a place with ample sunlight and try to choose a spot where it is at least partly sheltered from heavy winds. While the frame may protect the plants inside from those winds, they can still cause excessively cool temperatures within the frame. Facing the incline of the top of your frame to the south will help assure you’re getting the proper amount of heat and light throughout the year.
- Try to butt it up against a structure. Unlike a greenhouse, you don’t have heat going to your cold garden. Therefore, a natural form of insulation can assist in keeping the internal temperature a bit warmer. You can place it against your house, a barn, a shed, or a greenhouse. If you have it freestanding, consider buying some straw, since locating a bale of hay against the back of the frame can offer some additional insulation.
-
Match your materials with your climate. The prebuilt kits that offer a complete polycarbonate cold frame garden are great in warmer climates. But if you live in a colder environment, you’ll find that you can’t grow
salad greens early in the season and certainly not throughout the winter. In colder environments, consider wood, brick, or concrete blocks topped with a polycarbonate material for better results.
greenhouse in the garden summer - Incorporate ventilation. Just because you don’t have added heat to the cold frame doesn’t mean it won’t get a bit steamy and uncomfortable in there for your plants. If not ventilated properly, you can fry the greenery inside, or you can cause other, less noticeable problems that will haunt you later. For example, if it is consistently too warm in the cold frame, plants will grow ‘soft’, and that can make them much more easily damaged when you transfer them to a more permanent – and harsher – environment. Ventilation can be accomplished by propping open the top with a stick, or sliding open the glass if you’ve managed to find a sliding door. You may want to use a digital thermometer to monitor the temperature inside the cold frame.
- Keep it clean. You’re in a yard, and that means it’s easy to come by a lot of debris that could get stuck on top of your cold garden. Leaves, cut grass, and so much more can become a significant problem, simply because the debris blocks the light. Without sunlight, not only do the crops lack nutrition; they also don’t get the proper residual heat.

Capturing Extra Heat and Light

The more heat and light you can capture in your cold frame, the more likely you are to be able to start earlier in the season or potentially grow some greens in the winter. In addition, you’ll have more options regarding what you want to grow and when.
To increase the amount of light in your cold garden, paint the interior walls white. White is a combination of all the colors of the light spectrum, and this will help reflect the incoming light to increase its potency. Alternatively, line the walls of the cold frame with aluminum foil, which will also reflect light without any potential damage to your crops.
For extra heat, save some water or milk jugs. Rinse milk jugs thoroughly before using. Then, paint your jugs black and fill them with water. Locate them inside your cold frame – how many you should use depends on the size of your cold frame garden. Throughout the day, these jugs will attract heat so that, at night, they have heat to put off, keeping the temperature inside your cold frame garden more consistent and better for a wider variety of crops.
Starting Seedlings in a Cold Frame
While the plants you can start as seedlings in a cold frame are widely varied, there are a select few that aren’t suited even to this environment. Regardless of your climate, it’s best to start seedlings of peppers, tomatoes, and cucumbers indoors, in a sunny window of your home. Almost any other vegetable can get an early start on growth in a cold garden if you follow instructions.

- Choose your location. When you have the spot picked for where you’re going to put the cold frame, and you have built your walls, spread organic potting mix two to three inches deep in the area you intend to use for seedlings.
- Using something as simple as popsicle sticks, you can create your border for each type of seedling.
- Create furrows in the soil, and drop in evenly spaced seeds. Make sure that there is enough space so that the seeds are not choked for nutrition of any kind to avoid stressing your seedlings early on in the growth process.
- Use a little more potting mix to cover them in a shallow layer.
- Mark each section as to what it is using a small stake.
- As soon as it is manageable, since transplanting seedlings earlier is better, move them to another area of your cold frame designated for them, already covered in another two-inch layer of potting mix. To move, use a small dowel that comes to a point to dig beneath them. Carefully lift and loosen the threads of roots until you have extracted your seedlings. Hold them by a leaf rather than a stem to avoid crushing parts of the plant that are crucial.
- In the new potting soil, poke a hole with your dowel.
- Tuck the roots in lightly, trying to keep plants about three inches apart.
- When they have grown large enough to move into the garden, don’t try to extract them from the soil. Instead, cut the soil into squares with a knife so that one seedling is in the middle of each. To make your job easier and keep the soil holding together, make sure it’s moist.
- Use a trowel to lift out each individual square. Put them in a tray or container for moving to the garden.
Conclusion
Cold gardening is a great solution, especially if you have limited space or want to grow plants that aren’t normally conducive to your climate. You can also start growing earlier in the year and keep growth thriving longer, even after the first frost.
Whether you build your own frame from recycled material or you purchase a kit to get started, this is an excellent practice, and it allows you to create a better environment for tons of plant types, especially food products, without using any energy other than solar radiant energy.
These frames can be portable, temporary, or permanent with sturdier materials. They are extremely adjustable to meet your needs, which makes them ideal under just about any circumstances. Take advantage of some of the materials you already have, and try your hand at it.