Key Takeaways
- Curved benches are a popular choice for fire pit seating, creating an inclusive and warm atmosphere for you and your guests.
- Adding raised garden planters to your fire pit bench can enhance the visual appeal and create a cohesive look, whether the fire is lit or not.
- Repurposing old materials like cement blocks or tree stumps as the base for your DIY fire pit bench adds character and sustainability to your outdoor space.
It's cozy and entertaining sitting around a warm fire pit. Whether it's a cooler evening in the summer or a chilly afternoon in autumn, fire pits are excellent places to socialize.
While there are plenty of options for the fire pit itself, one essential element long-lasting fire pits have in common is the need for seating. Without comfortable seating, the bonfire isn’t as enjoyable. Thankfully, there are a few ways to add unique, comfortable benches around your fire pit. Even better, you can make them yourself! Learn more about different DIY fire pit benches and how to make them!
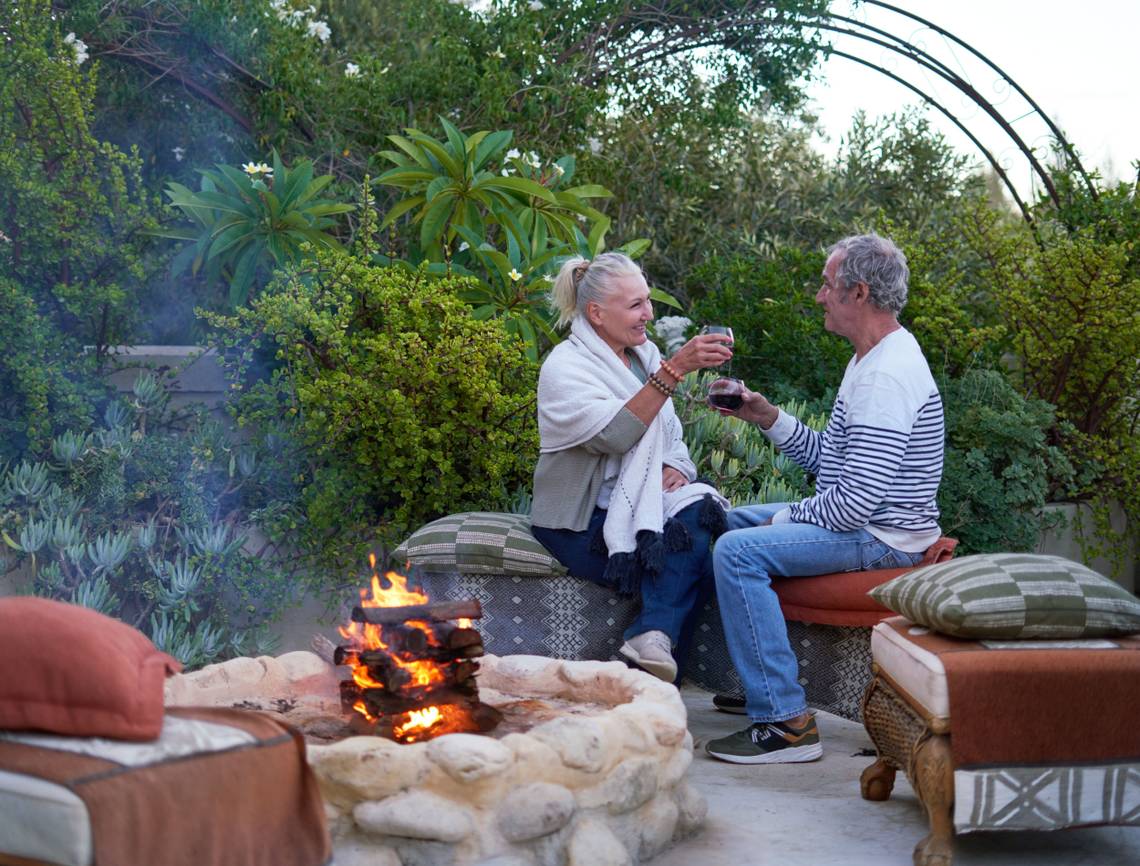
1 Curved and Comfortable
A curved bench allows equal viewing

A curved bench is a popular seating arrangement to make you and your guests feel included and warm by the fire.
Materials and Tools Needed:
- Pressure treated lumber (1 x 6 (seating), 4 x 4 (legs), 2 x 6 (framing))*
- Exterior screws (⅖ inch)
- Exterior Lag Bolts
- Pencil
- Sander
- Drill
- Speed square
- Circular saw
- Table saw
- Weather-protecting wood sealant
*The amount of wood you need depends on how long you want your bench. Once you have the materials, it’s time to make your curved bench.
|
Step 1 |
Using a table saw, cut the bigger pieces of wood to create the base (the bottom of the framework). Screw the base together before step two. |
|
Step 2 |
Once the base is screwed together, flip over and add the legs of the bench. Place a pair of legs under each section for extra support and screw them in. |
|
Step 3 |
Make the top of the bench pieces, where you will sit. Screw on. |
|
Step 4 |
Cut the back braces so that the wood leans backward 20 degrees. |
|
Step 5 |
Bolt the back brace to the bench. |
|
Step 6 |
Stain and paint your bench to protect it from the elements. |
Once your curved bench is completed, let it dry completely before hosting or sitting!
2 Add a Raised Garden for Appeal
Grow plants that can handle being around high-heat

Set your fire pit apart and add plants and accessories for visual appeal. Adding planters or a raised flower bed to the backs or sides of your bench can add a cohesive look. Thanks to the raised garden, your fire pit will look lovely whether it's lit or not.
Materials and Tools Needed:
-
Pressure-treated lumber (for a two-person bench)
- Four 2 x 2 x 8
- Twelve 1 x 6 x 8
- One 4 x 4 x 6
- One 2 x 4 x 4
- Three 2 x 6 x 8
- Hand Saw
- Drill
- Staple gun
- Jigsaw
- Deck screw
- Pencil
- Square
- Weather-protecting wood sealant
With everything in place, build your bench with raised planters on both sides.
|
Step 1 |
Measure and cut all your wood with a handsaw beforehand for a more organized process. Ultimately, the planters should reach 28¼ inches high, and the seat should reach 27½ inches long. |
|
Step 2 |
Create the base of the bench and the planters. With a planter box on each side, nail slabs of wood in between the designated planters. This will be where you and your guests sit. |
|
Step 3 |
Once the seat is in its place, build up the planter to raise it. Visually, the raised garden will be about shoulder level when you sit. |
|
Step 4 |
There is no backing to this bench, so once the planters are built, sand everything down and stain with a weather-resistant stain. |
|
Step 5 |
Using a staple gun, staple the liner inside the plant beds before adding soil. This will save the wood. Plant plants in the planters that are safe near a fire. Lavender is a great option. |
3 Wood on Wood for a Lodge-Feel
Add seating to old stumps or cement blocks

Do you have a couple of old cement blocks lying around? What about tree stumps? Large bases that can withstand heavy weight, like cement cinder blocks or old tree stumps, are great options for legs on a DIY bench.
Materials and Tools Needed:
- Repurposed wood (three to four pieces of 2 x 4 for a two-person bench)
- Two stumps or cinder blocks
- Long screws
- Drill
- Brick paint (optional)
- Weather-protecting wood sealant
Having extra parts around your work shed or yard makes this DIY bench a great project. However, you can also buy cinder blocks or use old stumps of wood found in the forest.
|
Step 1 |
Place your choice of base (cement blocks or stumps) where you want it situated by the fire pit. |
|
Step 2 |
Lay your wood slabs on top of the cinder blocks or stumps. |
|
Step 3 |
Drill a screw from the wood (where you'll eventually sit) to the base to secure the bench. |
|
Step 4 |
Sand and seal the wood to protect it from the elements. |
|
Step 5 |
If you are using cinder blocks, buy brick paint to give your blocks a warmer aesthetic. (Optional.) |
Using items for a fire pit bench, you already have is sustainable and creates a relaxed feel by the fire.
4 A Versatile Bench
Chairs or bench — your choice!

If you're looking for a more versatile approach to a fire pit bench, try making individual seats that come together as a bench. When the chairs are placed next to each other, the curvature of the wood creates an excellent bonfire bench that can be separated into chairs if needed. This way, you can organize the seating around your fire any way you want and aren’t stuck with a permanent result.
Materials and Tools Needed:
- Construction grade plywood (10 2 x 4s and 15 1 x 4s for a four-person bench)
- Screws
- Circular saw
- Drill
- Sandpaper
- Measuring tape
- Weather-protecting wood sealant
- Paint (optional)
With materials and tools in tow, create a customizable bench that can be separated into chairs. Plywood is a good choice because it's inexpensive. Examine the wood before buying to ensure it's sturdy.
|
Step 1 |
Using measuring tape and a circular saw, measure and cut all your lumber to the sizing of your choice. You'll need legs for each chair (four per chair), seat slats for each chair (nine per chair), stretchers for each chair (two per chair - stretchers are a horizontal support beam), and aprons for each chair (two per chair - aprons are a vertical support beam). |
||
|
Step 2 |
Add the legs to the stretcher with some screws. |
||
|
Step 3 |
Screw on the aprons for a more secure seat. |
||
|
Step 4 |
Design a curved back for each chair using a circular saw. Clamping the plywood in place can also help curve the wood. The curved back makes it more comfortable to sit on while also creating a curved look. |
||
|
Step 5 |
Sand, stain, and paint! |
||
Since this bench is not permanently attached and can be separated into chairs, feel free to add a sense of style through seat cushions or fun color spray paint.
From cement to wood, a lot goes into making a DIY fire pit bench. With a few accessories like plants and cushions, your fire pit became much more comfortable. Share with like-minded friends and readers to make your own backyard bench!