When the weather starts to turn cold, finding a way to keep your plants safe from frost and snow is a priority. If you don’t want to build an entire structure in your backyard garden, a cold frame is an excellent portable option that can protect your more sensitive plants and vegetables from harsh elements. Luckily, building a cold frame is an easy undertaking that almost anyone can do with a few tools and materials, and can be done in as little as a couple of hours.
Why You Need a Cold Frame
Many issues with frost and moisture in the wintertime can be remedied with a large, permanent structure like a greenhouse or a shed. However, not everybody has the space, time, or money to build something that complex and large. A cold frame is a small, portable structure with a clear top and no bottom that can be placed over a patch of plants or seedlings when the weather starts to turn, and then can be stored away when the warm months come again.
Being able to move a cold frame around is one of its best attributes. Because of this, you can use it wherever it might be needed the most and can experiment with locations around your garden. It’s a nice feature to not be locked into one location, and have to plant your garden around it.

Stephan H via Unsplash
What You Need
Building a cold frame is relatively simple and doesn’t require much technical knowledge beyond knowing how to cut and measure pieces of wood and use a screwdriver. By gathering all of your materials beforehand, you can have everything you need when you start building your cold frame and can avoid going back and forth to the hardware store. For this project you will need:
- A screwdriver
- A saw
- A recycled window pane and frame
- 4 pieces of 1x6 decking wood
- Deck screws
- Hinges
All of these materials can usually be salvaged from previous projects or bought new. The windowpane and frame can be any size you can find and you will build the cold frame around it since it will serve as your lid.
How it’s Built
We have spread this project out over five simple steps to ensure that it is not too overwhelming. Following these steps closely, you should be able to build this project in less than a couple of hours. There isn’t much to do in the way of techniques and you aren’t necessarily trying to make this project look pretty, it just has to serve the function of keeping your plants protected from the frost and snow when the weather starts to get cold. However, if you want, you can absolutely paint and finish your completed cold frame if you intend to keep it as an accent piece in your backyard garden.
Step One: Measure the Space

Image Credit: Michael O'Connor
The first thing you need to do is measure the space you want to cover and make sure your windowpane is large enough to provide the proper coverage. If not, you may want to replant any seedlings closer together to ensure that your cold frame will be able to completely protect them. This will also have the added benefit of keeping them warmer by holding in humidity due to the close proximity.
Step Two: Gather and Cut Materials

Image Credit: Michael O'Connor
Next, you're going to want to measure and cut your pieces of decking to be the same size as the outside of the window frame. Cut carefully and make sure that you're leaving enough room for error as you make your cuts. You will need to cut two pieces of decking for each side, to give yourself a 12” tall cold frame that can hold all your plants.
Step Three: Construct the Base

Image Credit: Michael O'Connor
Next, you will put your frame base together. Stack two pieces of decking vertically and attach them using a third piece of scrap decking and some deck screws. Then, assemble your box by attaching all the sides using the deck screws through each edge. By the end, you should have a completed box that is the same area size as your window pane and 12” in height.
Step Four: Attach the Lid

Image Credit: Michael O'Connor
Attach your hinges to the side edge of the cold frame where you want the window frame to swivel. After they've been attached, screw the hinges to the window frame. The reason you want to do it in this order is that it will be difficult to maneuver the hinges and attach them to the base if they're already screwed to the window frame.
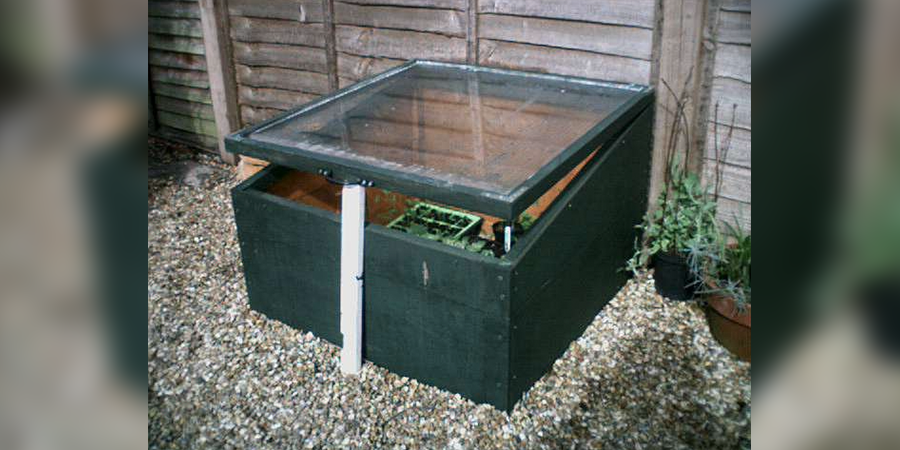
Step Five: Place Cold Frame in Your Garden

Image credits: Moormand via Wikimedia
Once your cold frame is assembled, you're ready to place it over your vulnerable plants for the long winter. Once you've placed the frame, pile some soil along the edge of the base to ensure that it's sealed off on the bottom from any cold winds or frost. If you like, you can also place some 100-watt light bulbs on the bottom side of the window frame for extra warmth if you're concerned about extremely cold conditions.
When the weather warms up again, you can remove the cold frame and store it away for the next winter or use it for things like hardening off seedlings or protecting especially vulnerable and sensitive plants. There are quite a few uses for cold frames beyond just keeping plants warm when the ground starts to frost over.
Conclusion
This is an easy project that can work wonders toward keeping your plants safe over the winter. It's also incredibly useful if you experience a sudden cold snap. You can simply get your cold frame out of storage and place it where you need it, without any construction or complicated techniques. By having a cold frame handy, you'll never have to worry again, if your plants survive the winter. Have you built your own cold frame already? Share and comment below to let us know how it turned out. Would you rather skip all the work and buy a cold frame? We have you covered there too with our list of the best cold frames.