Known as a variety winter squash due to it’s ability to store well after harvest and into the cooler months, spaghetti squash—named so due to its long, noodle like flesh when cooked (think al dente with very subtle nutty squash flavor)—is a favorite of these varieties due to how well it pairs with all sorts of dinner favorites and how many ways it can be cooked: in the oven, on the grill, or even in the crockpot.
I made the mistake (or not, depending on your viewpoint) of planting three vines last spring and in return still have over a dozen squash still in storage despite giving MANY away. I will warn you- these vines put out A LOT of tendrils and will supply you with a continual source of squash once they begin to produce. Learn from my mistake and consider your space in advance or you may end up with a vegetable jungle like mine.
Not wanting my squash to go to waste, I’ve gotten pretty decent at finding new ways to serve this unique vegetable that serves up more texture than flavor, making it the perfect dish to pair with sauces and other strong flavors.
*You might also like: 31 Amazing Garden Vegetable Recipes
What You Will Need:
On top of the ingredients listed below, you’ll need at least one small, and one large saucepan, as well as something to roast your squash in. You may also slow cook your squash over a period of 4 to 6 hours (technique described below)
Squash Prep Time: 5 minutes/ Cook Time: 45-60 minutes/ 450 degree
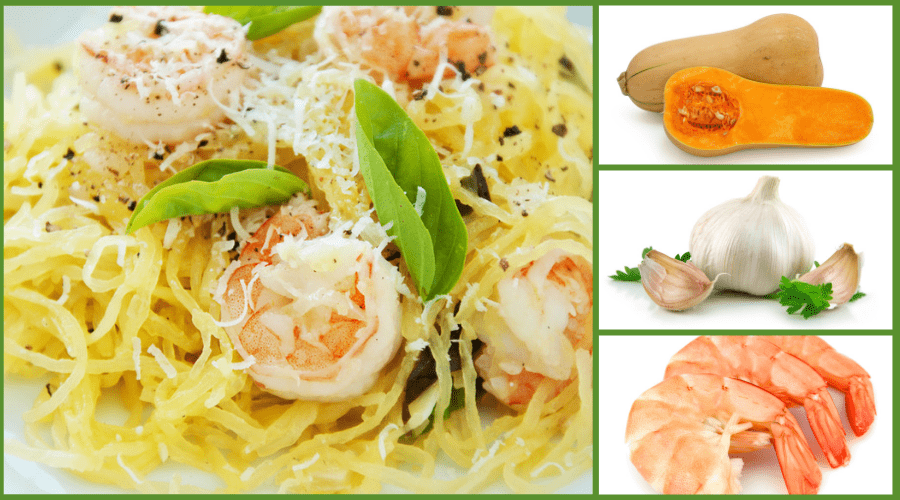
- 1 small to medium sized spaghetti squash
- 2 Tablespoons olive oil
- 2 teaspoons garlic powder
- Salt and pepper to taste

Creamy Garlic Sauce Prep Time: 5 minutes/Cook, Time: 10 minutes
- 2 to 4 cloves of garlic
- 1 to 2 teaspoons garlic powder
- 2 Tablespoons cornstarch
- ½ cup water (divided)
- 2 cups whole milk (you may substitute 1% or 2%)
- 1 Tablespoon fresh or dried parsley
- Salt and pepper to taste
Lemon Shrimp Prep Time: 5 minutes/ Cook Time: 10 minutes
- 1-1 1/2 lb veined and peeled shrimp (size of your choice)
- 2 Tablespoons olive oil
- 2 Tablespoons Lemon juice
- Salt and pepper to taste
Optional Needs
- Fresh parmesan
- Fresh lemon slices
- Slowcooker
Alternative Squash Cooking Directions
The recipe I will describe uses a roasted squash, but if you wish, you can also prepare your squash in a slowcooker over a period of 4 to 6 hours on high. So how do you cook spaghetti squash in the CrockPot exactly? Easy- simply wash your squash well, prick it multiple times with a fork or knife (be sure to get through the thick rind), place it whole in the slow cooker with 1 to 2 cups water for 4 to 6 hours depending on size. Once it is soft, allow it to cool and then cut lengthwise and scoop out the seeds. Be careful not to scoop any of the flesh with it.
Getting Started:
The main reason I opt to roast my squash is because I love the flavors that are infused into the flesh during the process. Spaghetti squash has a very, very subtle nutty flavor that is easy to blend with the flavors of your choice. Although it is not tender like a fully cooked spaghetti noodle, it does have a crisp al dente take and serves as a fabulous foundation for a low carb (or paleo) selection of sauces and stir-ins.
Have I mentioned what a healthy alternative this is to carb-packed noodles as well? Spaghetti squash is packed full of fiber, vitamins C and A, calcium, and potassium- making it a super alternative to pasta. I love me some pasta, but occasionally we need to cut back as a whole, and this is a great way to add in your favorite marinara (with meatballs!) or curries without a heavy noodle getting in the way.
Step 1: Cut in Half & Clean Squash
Pre-heat your oven to 450

Before you get started, clean the outside of you squash off with a little soap and water to remove any dirt or gardening residue that may have been left behind. Then split the squash lengthwise with a sharp knife and scoop out the seeds with a metal spoon (I used an ice cream scoop; it worked fabulously).
Ok - this sounds easier than what it is. Winter squash have a tough (I mean TOUGH) rind, and you could seriously do some damage to yourself with a slipped knife, so please approach this step with caution. What I do is gently slip the knife in at about a third of the way down before applying enough pressure to get it through the entire veggie. Then I rock the knife back and forth which allows the rind to crack in the direction of the knife. I repeat this one or two more times depending on how well it is cracking, and then hit it down hard on the counter which causes it to split cleanly open.
Step 2: Oil and Season, add Water, and Bake

Brush the insides with olive oil, and season deliberately with garlic powder, salt, and pepper.
Then turn it upside down on your tray (I use a baking tray lined with tinfoil for easy cleanup) and add about a half cup of water to the bottom of the tray to provide some steam to keep the flesh moist through the cooking process. This is entirely optional, but I find it works well with squash that has been stored through the winter.
Bake your squash on 450 for 45 to 60 minutes, or until fork tender and the flesh easily peels away from the shell.

What to remember: Check the tenderness of the squash when removing it from the oven. Although this squash will never be noodle tender, it does soften with more time in the oven. If it is still too crisp for your liking, place it back in with a little more water to cook until it achieves your desired texture. Do keep in mind it will always have a slight cooked veggie crunch to it.
Step 3: Prepare Sauce

With about a half hour left on your squash, you can get cooking the rest of your ingredients which will stay warm either over low heat or covered over a warm burner. I like to take care of the sauce first, because if it it does thicken a little too much it’s easy to stir in a bit of warm milk to thin it out before serving.
- Bring a fourth cup of water to boil over medium heat and add in finely chopped garlic cloves (2 to 4 to taste) and garlic powder.
- Allow this to cook down until water is evaporated (about 5 minutes) and stir in the Cream (or milk) parsley, salt, and pepper.
- Mix the cornstarch with the rest of the water (¼ cup) and stir in until thickened. About 3 minutes.

What to remember: If you used a larger squash, consider doubling this recipe to make sure everyone gets as much as they want!
Step 4: Prepare Shrimp

Depending on what size shrimp you use will determine how long it takes to prep this step. My household prefers the small frozen shrimp due to over half the population having tiny fingers who give up on utensils quickly. Fresh shrimp will need to be peeled and deveined and will make this step take a bit longer, so be sure to plan ahead.
- Add olive oil and lemon together with shrimp in the pan and toss to coat well over low heat, then cover and let simmer for about 3 minutes to get the lemon flavor well infused into the shrimp.
- Take cover off and add salt and pepper. Stir shrimp as liquid sautees down in the pan (approximately another 4-6 minutes or until shrimp is pink).
- Leave on low heat, or re-cover and let sit until needed.
What to remember: Feel free to add in more lemon to taste, or even use fresh lemon slices within the saute itself.
Step 5: Pull Squash

When your squash is finished baking pull it from the oven and with a mitt, grasp the half shell and turn over. If the flesh is of the tenderness you prefer, take a fork and ‘shred’ it out into another bowl. It should pull easily and separate into spaghetti like strands.What to remember: If you weren’t happy with the tenderness of the squash, even after you have pulled it from the shell, add a little water and cover with a plate in the microwave for 5 minutes at a time.

Step 6: Serve

Mix your sauce into your serving and top with shrimp. We ate this as a light stand alone dinner, but it serves up well next to grilled proteins and garden veggies as well, and has both a light flavor, and heartiness to use as a year round choice.
What to remember: You can serve your meal back in the half shells of the squash for added fun! Add some sliced sausage, or cajun chicken for an added zing! Also - to add in a little extra saltiness use fresh grated parmesan!
Hungry Yet?
If your stomach is rumbling, it’s doing so for good reason. You may want to play with the ingredients to add in more or less flavor to taste, but regardless of your choices this is sure to be a winner. I like to make this up and add in sliced sausage as well, especially in the summer when we have the grill going constantly. It also serves well next to fresh garlic bread! Come spring, don’t discredit your spaghetti squash seeds and give it a go!
Not only are they easy to grow, but they are fun and packed full of nutrients - plus you can mix in almost anything you can think of!
Are you a fan of spaghetti squash recipes? Have any to share? We’d love to hear from you below! And as always, share the love!
Check out another great squash recipe here.