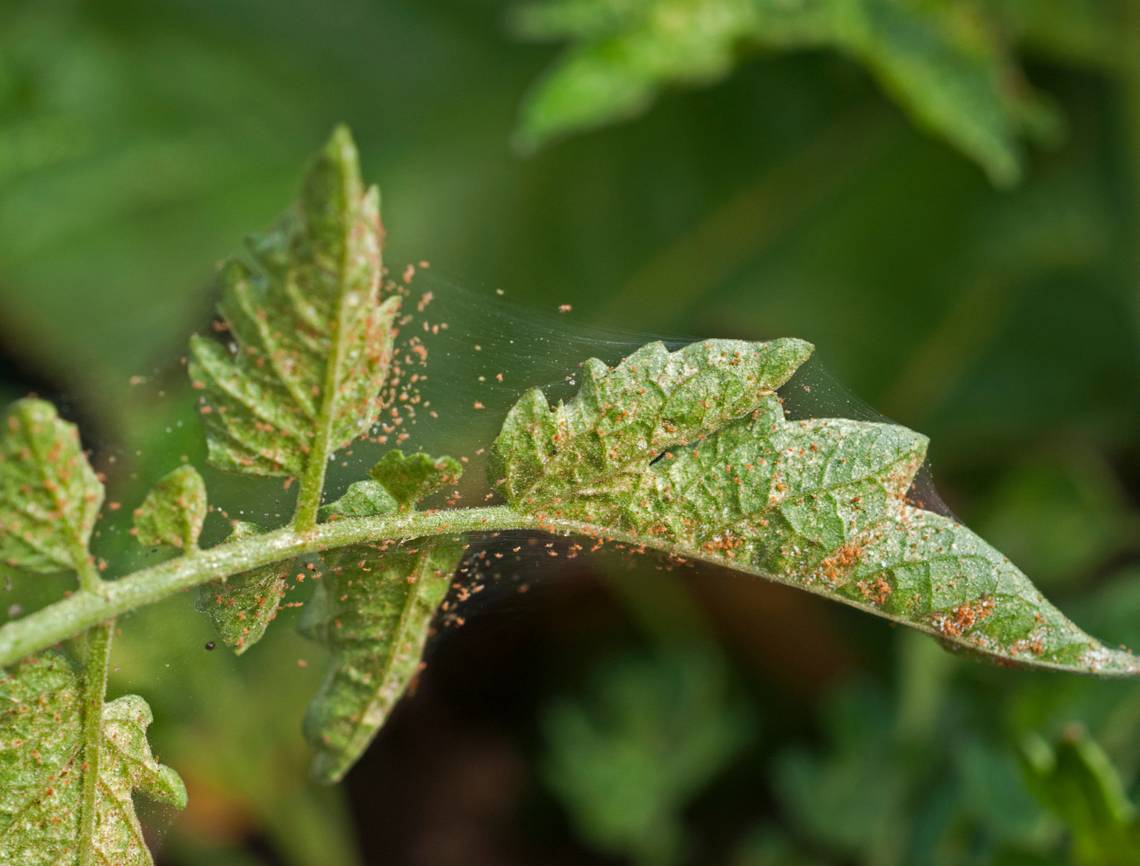
What a tangled web teeny spider mites in your garden can weave. These arachnids that are related to spiders, scorpions, and ticks can be difficult to spot on plants, but the damage they leave behind is very visible. White flecks or blotches on leaves, distorted leaf shape, and faded or yellowish leaves are early signs. When you notice webbing on several plants it means you are dealing with a serious infestation.
To make matters worse, these insects enjoy a botanical buffet. They will suck the sap of vegetable and fruit plants, herbaceous ornamentals, conifers, and woody plants. Luckily, gardeners have a variety of defenses against spider mites, including the powers of observation and preventative methods, like companion planting.
WHAT YOU WILL NEED TO GET RID OF SPIDER MITES ON PLANTS
- Hand lens
- Piece of paper or cardboard
- Garden hose (with different settings)
- Companion plants (such as shasta daisy, onion, and dill)
- Mulch
- Rubbing alcohol
- Liquid dish soap
- Water
- Spray bottle
- Insecticidal soap
- Neem or an essential oil
- Humidity meter
- Humidifier
STEP ONE: KEEP CLOSE WATCH

Image credit: Plant pests and diseases via Openverse
Get up close and personal with your plants to try to spot spider mites before they become a major nuisance. In particular, check the undersides of leaves. Use a hand lens or magnifying glass so that they don’t escape your gaze.
Carry a piece of paper or cardboard with you as you do your inspection rounds. If you notice changes to leaves or flowers, shake some of them on top of the paper or cardboard. Check for any tiny black spots — those pesky mites — scurrying around.
STEP TWO: WATER, WATER EVERYWHERE

Image credits: 9436196 via Pixabay
Dry conditions in your garden invite spider mites to invade and stay. It’s not just your plants you have to worry about. These arachnids are drawn to any arid area, which includes walkways and brick or concrete borders.
So first, water plants frequently — especially underneath leaves — to rid plants of spider mites. While you are watering your plants or lawn, take the time to spray hard surfaces such as pathways. If you have clay or stone pots — empty or with plants — hose down their exteriors as well.
STEP THREE: ADD PLANT DETERRENTS

Image Credit: *_* via Creative Commons
Companion planting is another preventative weapon you can wield against spider mites. Some of the plants they find repellant include chrysanthemums, shasta daisy, onion, chives, coriander, and dill.
Another benefit of companion planting is that it is more environmentally friendly than using pesticides. Plus, you can harvest some of the herbs for your culinary delights.
Choose companion plants that are the hardiest in your zone and place them near the plants that spider mites are targeting. You can also boil these companion plants to create sprays to treat plants affected by spider mites.
STEP FOUR: MULCH MORE

Image credits: fotosr via Canva
Mulching helps your garden to retain moisture and reduces the amount of watering you have to do to keep spider mites away. As organic mulches decay, they nourish plants, keeping them healthier and better able to endure an onslaught of pests.
The natural oils in bark or chip mulch from cedar and cypress trees are particularly effective at repelling spider mites and garden insects in general. While straw can prevent pests from laying their eggs.
Inorganic mulches do have a role to play. For instance, plastic mulch coated in aluminum reflects the sun’s rays, and that in turn can confuse or blind pests such as spider mites.
STEP FIVE: USE A DIY MITICIDE

Image credits: HappyNati via Canva
Another way you can get rid of these arachnids is to create your own homemade miticide, a solution that kills mites. Two common home remedies are rubbing alcohol and soap solutions.
To create a rubbing alcohol miticide, mix 1 cup of rubbing alcohol with 30 ounces of water in a spray bottle. Shake to combine. Wet a cotton swab with the solution and wipe the leaves with it to kill and remove mites. This will also prevent mites from returning next season.
To make a soap insecticide, combine 1 teaspoon of liquid dish soap and 1 quart of water into a spray bottle. Shake vigorously to combine. Locate the mites on the leaves and apply the spray directly to them. Only well-targeted applications will be effective. It’s best to use your DIY miticide in the early morning or late evening. This will help to protect leaves from any damage, including burning.
STEP SIX: APPLY AN INSECTICIDAL SOAP

Image credit: photoguns via Canva
If you prefer a buy-and-go solution instead of making your own miticide, insecticidal soap sprays are the answer. These products are basically more refined liquid soaps, specifically formulated to prevent damage to plants, such as burning, especially when the sun's rays are hottest.
Follow the directions for diluting the insecticidal soap spray. If you don’t notice an immediate effect, it’s best to wait about five days and repeat the treatment with the same concentration the manufacturer recommends. Avoid using a higher concentration.
STEP SEVEN: USE A NATURAL OIL

Image credits: webentwicklerin from Pixabay via Canva
A natural pesticide with a sulfur-like odor, neem oil suffocates spider mites. On the other hand, it does not adversely affect people, plants, fruits, or vegetables. Also, its bitter taste is a turnoff for pets. In other words, it’s a very safe alternative for your mite infestation. You can purchase ready-to-use neem oil or buy a concentrate and mix it yourself at home. Combine 1½ teaspoon per 1 quart of water, plus ½ teaspoon of soap (as an emulsifier). Try to avoid getting it on your clothes or any garden furniture.
Research also shows that essential oils can be very useful. An Egyptian study revealed that rosemary, chamomile, spearmint, and coriander oils were the most effective for killing two-spotted spider mites and their eggs.
To try this option at home, combine 1 teaspoon of one of those essential oils with 1 quart of water and shake vigorously. Directly spray the mites with the mixture.
STEP EIGHT: PRUNE AND SEPARATE

Image credit: Maria Orlova via Pexels
When spider mites have severely damaged leaves — for instance, disfiguring them or turning them brown — remove them. Drop them in a bucket of soapy water before placing them in the garbage.
Also, if potted plants have been infested, treat them with any of the above remedies. Next, remove them from the vicinity of other plants until you are sure the problem has been contained.
STEP NINE: ADD HUMIDITY

Image credit: scrappy annie via Openverse
If you have a greenhouse in your garden, spider mites might just sneak their way inside. Use a humidity meter to test the moisture in the air. Because spider mites prefer dry environments, humidity can be an effective deterrent.
Depending on how big your greenhouse is, a small or medium-sized humidifier that you would use inside your home will effectively humidify the greenhouse. Alternatively, install a large humidifier or use two small or medium-sized one.
Monitor how your greenhouse plants are doing, however, because too much humidity can encourage other pests and diseases. On warm days — when humidity is higher — turn off the humidifier. Also, if the humidity is too high, keep your greenhouse door open until a healthy balance is restored.
PREVENTION IS BETTER THAN CURE TO GET RID OF SPIDER MITES
If your area is prone to spider mites, get busy implementing some of the preventative measures listed here the minute you plant a garden or inherit one. It will save you a lot of time and effort, and protect plants from the damage an infestation can cause. However, if you think the job is too big for you, consider hiring a pest control professional, particularly one who specializes in eco-friendly solutions.
Had a spider mite headache in the past? Let us know which of these methods worked the best for you.