I love utilizing my grill throughout the year, and once the warmer seasons are upon us it is pretty much a daily go to concerning our dinner choices. One of my favorite recipes is Beer Butt Chicken. Not only does it make me giggle every time I make it, I love mixing up different flavors to infuse and baste with.
This particular recipe combination came about simply because of what was currently in my fridge, and I’m glad I had the insight to make it up. This chicken should come out with a slight smokey sweet infusion with a little bit of heat – and be beyond juicy to eat either all on its own, or mixed into anything else you may want it for.
WHAT YOU NEED:
Of course everyone may have their own way of doing this, but my experiences with various techniques always has me coming back to this particular method to get the juiciest possible meat.
Overall Prep Time: 10-15 minutes
Cook Time: Approx. 2 to 3 hours at 300 degrees, until thermometer is at least 165 degrees Fahrenheit.
- 1/4 can Dr. Pepper – This candy flavored cola provides the perfect dark, sweet taste to help tenderize and infuse your meat with a touch of sweetness next to the other ingredients.
- ¼ bottle of a dark beer or stout – Not just any beer will do. Be sure to get a dark beer (the darker the better) to provide a smokey, malty, nutty taste to help balance the sweetness of the soda. As the alcohol burns off it also helps to tenderize the meat.
- Whole Broiler Chicken – The average size of a broiler is approximately 4 lbs and feeds 2 to 4 people.
- Small aluminum bread pan
- 9×9 or larger aluminum or baking pan
- Propane or charcoal grill
- Meat thermometer
For Chicken Baste:
Mix together-
- ½ stick of butter melted
- 1/4 teaspoon of Tabasco
- ½ teaspoon garlic powder
- ½ teaspoon paprika
- ¼ teaspoon onion powder
- Salt and pepper to taste
OPTIONAL
Beer Can Chicken Holder– You most certainly can use one of these, but I have found that it doesn’t hold in the flavors as well as what I’m going to describe, although it is a very useful and effective tool.
PRE COOKING DIRECTIONS

Obviously you will want to start with a completely thawed chicken if it has ever been frozen. There are a few safe ways to defrost your chicken, but the safest by far is to let it thaw in your refrigerator at a ratio of 5 hours per pound. This way you ensure that no part of it is exposed to higher temperatures that can allow the growth of harmful bacteria.
STEP 1: MIX YOUR “BEER CAN” RECIPE
I decided to marry the savory and sweet of Dr. Pepper quite by accident when I didn’t want to buy a can of beer just for a chicken when I had plenty of bottled beer in the fridge. I simply decided to pour out the Dr. Pepper and pour in the beer to utilize the can, but decided to leave what didn’t fit in my glass in the can and add in about a forth of the bottle of beer.
This mixture created a deep smokey, malty, caramelized smell which infuses beautifully into a slow cooked chicken.

WHAT TO REMEMBER:
You want only about half to two-thirds of the can full of liquid in order to keep it from boiling over while cooking.
STEP 2: PLACE CHICKEN OVER CAN
This is where I utilize a small aluminum bread pan. This helps stabilize the chicken and also serves to catch the drippings directly beneath the chicken itself to help keep the flavor where you want it. Just place the can within the pan and form it to provide a good balance. An aluminum pan is nice and ‘bendy’ so you can pull out the sides to allow the chicken to basically sit upon it for even cooking.

Take your chicken and place the posterior end over the can. Go ahead and place it right up in there! This is the step that always makes me giggle. I mean seriously, the little headless chicken just looks like he’s chilling there.

WHAT TO REMEMBER:
I really don’t like the use of a beer can chicken holder. For starters I think it’s hard to get the chicken onto it, and then the chicken only hovers over the can. I find that by placing the majority of the can within the chicken you seal up all the chicken juices while it cooks to give you a much more tender, juicier cut of meat later on. But, if you are a can holder fan, by all means, utilize it.
STEP 3: BASTE THE CHICKEN
Generously baste your chicken with the mix suggested above, adding or replacing ingredients to taste. I choose to add a little bit of a spice to the recipe to add a touch of heat and enhance the flavors of each. You can also sprinkle some of the dry ingredients over the chicken after basting for added flavor.

WHAT TO REMEMBER:
Although seasoning will infuse into the meat somewhat, it stays mostly upon the skin of the chicken which also serves as a way to keep the meat from dehydrating while cooking. If spice isn’t your thing, you can always remove the skin prior to eating to avoid any bite the Tabasco and paprika may add.
STEP 4: POCKET THE WINGS
Our poor little chicken wings often get a bit too crispy when cooked over a grill, and the meat usually ends up going to waste. A few years back I got tired of overdone wings as I love how the flavors of crispy skin and the tender meat can taste on them when cooked just right. But I wasn’t sure how to keep the wings closer to the body of the carcass short of tying them together (which many restaurants do).

Enter the wing pocket. I have no idea why I didn’t’ think of this earlier, and maybe you already do this, but simply cut two little ‘pockets’ just above where the wings rest when pushed against the body. Then simply stick the wing tips in. This keeps the wings next to the body while cooking to provide a more even heat distribution.

WHAT TO REMEMBER:
Use just a small cut at first which you can always widen if needed. Too large a cut will allow juices to escape and may not hold the wings correctly.
STEP 5: COOK OVER A LARGER PAN
I like to use another larger pan under my chicken to allow for an indirect heat. This allows for the meat to cook more slowly and evenly, and creates a slight smoking effect which also lets the meat take in all the yummy flavors you’ve added. It also calls for an easier cleanup.
If you don’t have another pan, or want to cook directly over the grates, then don’t utilize the burners directly under the chicken. Keep them turned off and allow the indirect heat from the adjacent burners to do the cooking for you.

WHAT TO REMEMBER:
Don’t waste the beer you didn’t use. While you wait on your chicken, enjoy your beer!
STEP 6: CHECK TEMPERATURE
Ideally, if you can keep your grill between 300 and 350 degrees it should take about 2 to 3 hours to cook your bird depending on the size. You should regularly check the temperature of the chicken by placing a meat thermometer in the biggest part of the thigh. I always check in a few places to just confirm the bird is cooking evenly. You’ll want to make sure the temperature is at last 165 degrees for safety reasons.

What to remember:
The thickest part of the bird will naturally cook more slowly. Other areas of the chicken may be higher than 165 degrees but these aren’t the best places to determine doneness- so be sure to use the thick thigh area before pulling the bird.
STEP 7: REMOVE FROM HEAT AND LET REST
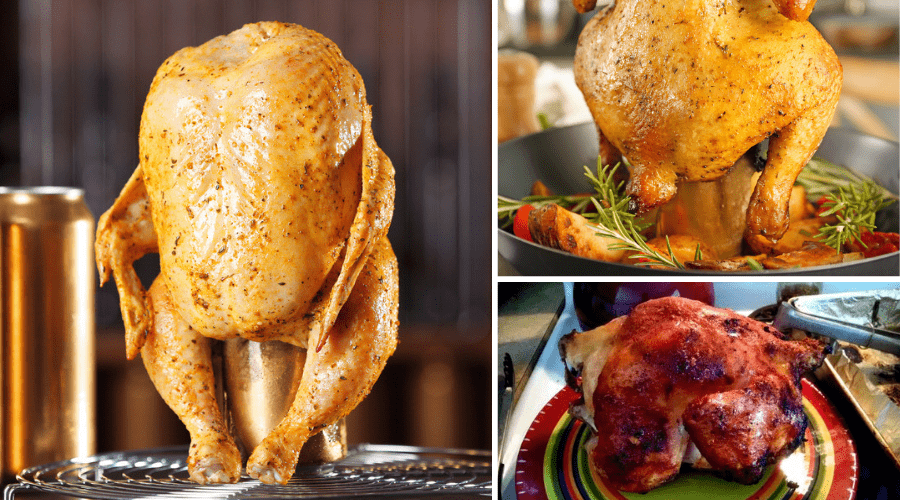
Once you remove the chicken from the grill let it rest about 10 minutes to allow the juices to redistribute. I take it off the can using tongs and by holding onto the can with an oven mitt. If you do this over the grill pan you can make sure you catch any spills that could occur to keep you from having a mess.
As you can see from the picture the entire bird browns up nicely with only a small bottom portion from where it sat in the pan a little less brown. There is very little meat through this area although it is still nicely flavored.

WHAT TO REMEMBER:
A slower cooked bird on a lower temperature will infuse the flavors more than if quickly cooked. You can adjust temperatures however to get the effect you desire.
ENJOY!

This bird ended up so juicy and tender that my kids were eating it off the plate as fast as I could pull it off the bone. Since I have a 3 and 6 year old who like to be picky at inconvenient times I definitely will be going back to this recipe over and over! The subtle spiciness and sweet infusion made a perfect pairing for a southwest inspired salad that evening, and was exactly what a hot summer evening called for.
On your way to the store yet? If you have any questions or comments, or even new takes on this recipe – please let us know below! And, as always, please share!
*You might also like to try: How To Make Pumpkin Spice Cookies.