If your plants aren’t thriving despite all your best efforts, you may need to take a closer look- a MUCH closer look. Many times, we fail to realize that the soils our plants are living in aren’t quite up to par with vegetative needs. This is especially true for plants that require certain nutrients to survive and produce. Luckily, it is easy to provide those nutrients that are lacking as well as amend soils to provide a healthier growing environment, but first, you need to know what is needed.
To do this all you have to do is buy a soil kit, either online or at a favorite gardening center. These kits are easy to use and are a fast and easy way to understand your soil’s chemical makeup and how it affects your plant growth. This easy to understand guide explains the importance of soil chemistry, and how to use a soil test kit in a simple, illustrated, step by step guide.
What is a Soil Test Kit?

Healthy lawn and garden beds require some very specific nutrients that work together to allow for plant growth and production. A soil test kit allows you to measure the amounts of these nutrients, as well as pH values to help you decide what fertilizers and soil amendments might be needed for healthier soil. Kits vary in their appearance, but all work in a similar manner using testing tubes, chemical reaction capsules, distilled water, and a small soil sample. The nutrients measured are:
Nitrogen (N): Nitrogen is the main component of chlorophyll, which is what plants use to convert sunlight into energy through the process of photosynthesis. It also supports amino acids, the building block of the plant itself.
Phosphorus (P): Phosphorus is essential for plant growth and plays a vital role in photosynthesis, energy storage, and cell growth. Without it, plants will not mature or produce properly.
Potassium (K): Potassium helps control the movement of water, nutrients, and carbohydrates in plant tissues. It also regulates photosynthesis, exchanges of oxygen and carbon dioxide, and is required for plant growth. This is also called Potash.
pH Levels: Many plants thrive in a soil pH level between 6.5 and 7.0 because this is where most available minerals and nutrients thrive. Certain plants may prefer a more acidic or basic soil, so be sure to know what requirements your plants have for optimal growth.
Why is Testing Soil Important?
You shouldn't wait for poor vegetative growth before testing your soils, in fact, it should be done seasonally in order to have an idea of how your soils replenish themselves. It also is helpful to realize what natural soil deficiencies may be present in your location, and what nutrients are lost through the growing season.
Also, soils can vary from one area of your property to another. I have had some plants thrive in one area, and the same plant shrivels and dies only 5 feet away. In almost every instance the soils were the culprit. Some soils drain easily, while others retain water; some hold nutrients available for roots, and others leach them quickly. Knowing what your soils are like can help you better determine what you can do to make them more friendly to plant growth.
Soil Types

Soils can be categorized into ‘types’ based on their texture and age. For the most part, you will deal with 3 types of basic soil categories that are easy to identify. It is important to have an idea about the types of soils you have because it influences how well it holds both moisture and nutrients for your plants.
Ideally, you want a good mixture of silt, sand, and clay mixed with organic materials for growing purposes. This mixture is called loam and contains a fairly equitable ration of silt, sand, and clay mixed with rich organics- such as compost. It retains water well but has excellent air flow to avoid drowning roots and allows water to drain. It also holds nutrients for available uptake and does not leach easily. You can amend any of your soils to create a rich loam for growing purposes.
Sandy
Sandy soils are dry to the touch, do not hold water well, and because of this also do not hold nutrients because they run off with the water. It is easy to work with, however, and you can add to it to help improve its health for growing purposes.
Silty
These soils are defined by very fine particles that retain moisture but are not large enough to hold nutrients well. It also compacts easily and creates problems with root systems. It also mixes well with other soils to improve its health.
Clay
Clay has the smallest particles of all the soils and is excellent for holding water, but that also means it does not drain well. It also holds nutrients but is very heavy and compact, which can drown out roots or make growth difficult. It is hard to work with, but when loosened with sand and silt improves its ability as a growing substrate.
Where Can You Get a Soil Test Kit?
Soil test kits are widely available online and at your favorite garden centers. There are a few different types you can choose from, such as basic kits that provide color charts, and digitized versions that provide an electronic readout. The only major difference between them all is cost, and if you simply need a quick result concerning basic nutrients to help you decide how to best amend and fertilize, inexpensive is best.
Since they all are providing similar readings, and for a budget option- I prefer those kits that use test tubes and chemical reactions. Plus, it is fun to do with kids as a science experiment that they can see happening right before their eyes.
Soil Kit Test Differences
Basically, you can choose from a few different types of kits to measure soil nutrient levels. As mentioned, for quick and easy results an inexpensive kit is generally the best place to start. If you are having continual problems associated with your soil or are concerned about other minerals and nutrients and their relation to groundwater, then you may want to consider something more professional overall.
Test Tube Chemical Kits

These are the basic kits you can find almost anywhere. They come with multiple tests so you can take full advantage of it through the seasons or as you add fertilizer. They basically require you to add soil, water, and some powdered chemicals for quick, color-coded results. They do usually require you to prep your soil solution 30 to 24 hours in advance (time is dependent on the type of soil you have).
Mail-In Kits
These kits simply require you to send labeled soil to a lab that will then send you back the results of your soil. Some allow for multiple samples, while others require a separate kit for each sample (which can get pricey if you are sampling multiple areas on your property). The results you receive are much more detailed than what you can do on your own, and often provide help for amending your soil if needed.
Professional Chemical Kits
In order to use these kits, you need to have some basic understanding of soil science and chemical reactions as the results you get are generally very detailed and specific. These are what is used for soil testing building sites and whatnot prior to surveys and help with urban spills, archeological sites, and other information that may be yielded up by the soils.
Digital Meters
These are fast and easy to use and simply require you to stick them in the ground. Most only measure pH and water however, although they are helpful for a quick assessment to determine if your plants are getting the nutrients that may be available.
Step by Step Soil Kit Test Directions: How to Measure Soil Nutrient Levels
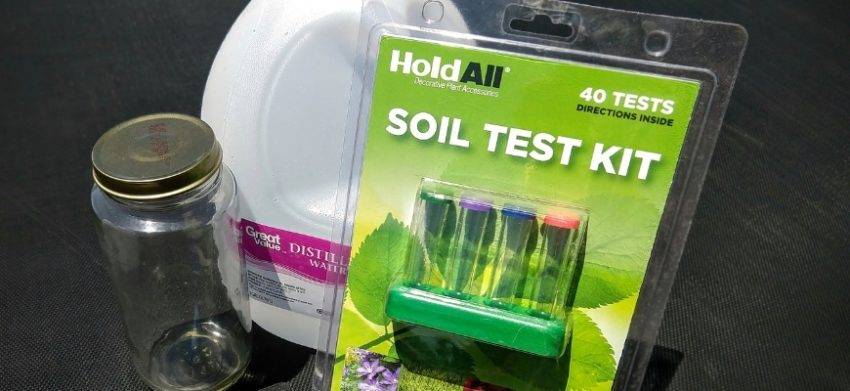
I purchased the HoldAll Soil Test Kit (see an equivalent test: here) from a local gardening center to run my soil samples. I like that it had multiple tests included so I could run various samples from different areas on the property and through the growing season. Like other kits, it was designed to measure the NPK and pH levels in the soil using distilled water and soil for quick and easy results.
What You Need

Soil Test Kit- Unless you have major soil problems that you are already aware of, choose a simple kit for easy results.
Although most soil tests work exactly the same, be sure to carefully read the directions provided by the company. They often provide hints to what yields the most accurate results and may also provide detailed suggestions for fertilization of specific plants, as well as a troubleshooting guide (which I always find helpful to read in advance to avoid the mistakes others make).
Soil Sample - Perennials, trees, and shrubs that have deeper roots should have samples taken from 6 to 12 inches below the surface of the soil. Otherwise, you can get soils at about 2 to 4 inches.
Distilled Water - Always use distilled water rather than tap or well water. The pH of your water will affect the results otherwise and provide inaccurate information.
Jar - You need a closable jar or container of some sort
A Notebook or Garden Journal- If you are taking the time to test your soil, then you definitely want to record and keep track of your results. This will help take the guesswork out of what next steps you need to take for healthier soils or fertilization, and help you keep your soil sample areas separate.
Step 1: Take Your Soil Samples

Gather your soils from the areas you are interested in testing. Be sure to get soil from 6 to 12 inches below the surface for woody perennials, bushes, and trees. Soil from 2 to 4 inches below the surface are fine for annuals and grasses. Be sure to remove any stones, sticks, weeds, roots, or any other organic materials from your samples as well as it can influence your results.
If you are sampling from multiple spots, be sure to label each from their location in order to have accurate readings. Placing soils in small plastic baggies or cups to organize in advance can be helpful.
Step 2: Create a Soil and Water Mixture to Set Aside

In order to get a good nutrient reading, you need to first create a soil to water mixture ratio at 1 parts soil to 5 parts water. Use distilled water if possible. Place this in a sealable, clean container and shake vigorously for at least one minute. Allow it to sit undisturbed until the soil settles out from the water. Depending on the types of soils you have this could take anywhere from a half hour to 24 hours. You want the water to be as clear as possible although cloudiness will not affect the testing accuracy.
Step 3: Take pH

Take your pH levels first to help establish the ability of your soil to hold nutrients. You can do this at any time and have results in minutes. It does not require the soil and water mixture from step 2. In my kit I followed these simple steps;
- Fill green-capped tube to the first line with soil
- Pour powder from green capsule into the tube
- Add distilled water to the 4th line
- Cap and shake tube vigorously
- Allow soil to settle and color to develop (takes about a minute).
- Compare the color to included chart to determine pH
Step 4: Take Nitrogen, Phosphorus, and Potassium (Potash)

The steps to measure these nutrients are all the same and in my kit are color coded: test tube caps color matches the capsule color. Purple for Nitrogen, Blue for Phosphorus, and Orange for Potash nicely matched up. I did find it was much easier to simply cut the very tip of the capsules off rather than try and separate them and spill them. The kit also came with 10 of each capsule, allowing you a total of 40 tests.
- Use the included dropper to fill your tube with water from your mixture to 4th line
- Pour powder from capsule into the tube
- Shake well and allow to sit for 10 minutes to develop color
- In good lighting (daylight is best) compare your color to the included chart
This kit is especially helpful as it provides a lot of information in relation to your results to suggest fertilizer recommendations and plant preferences. It also is easy to find online to use with other kits that may not be as detailed.
Step 5: Record Results and Plan for Soil Amendment/Fertilization if Needed

As mentioned, it is a good idea to write down what your results are. This is especially true if you are testing multiple areas- but even if you are only working with one spot it is smart to keep a record so you can compare results after fertilizing and amending soils.
How to Test the pH of Soil Without a Kit
If you aren’t interested in testing your soils in detail but would like a quick look at pH levels, then you can do so with a few things you most likely already have in your kitchen. Since pH is an indicator of overall soil health and nutrient ability, having an idea of your pH range can help you determine some basic soil needs. This is especially important for certain plants- for example, hydrangea color is based on soil pH. More alkaline yields pink flowers, while blue flowers are the result of acidic soils.
Test for Alkalinity
First, test your soil for alkalinity by placing approximately 2 tablespoons of soil into a container and adding a half cup of white vinegar to it. If it fizzes, then you have alkaline soils with a pH between 7 and 8.
Test for Acidity
If your soil doesn’t fizz, add distilled water to 2 tablespoons of soil in a container until you have a squishy mud. Add a half cup of baking soda and stir. If it fizzes, you have acidic soil with a pH between 5 and 6.
If you have no reaction at all, you have a neutral soil with a pH of 7.0
How to Adjust pH Levels
Since most plants have a wide tolerance of pH, the raising or lowering of these levels does not need to be an exact science. To raise your pH one point, add Hydrated Lime, Dolomitic or Calcic Limestone at a rate of 3.5 to 5 pounds per 100 square feet of soil.
To lower your pH one point, add Iron Sulfate or Aluminum Sulfate at a rate of 1 to 1.5 pounds per 100 square feet of soil. Retesting for pH should occur after 2 to 3 months of adding in any additional substrates to your soils.
Conclusion
The soil your plants grow within are incredibly influential to their health and production. Growing plants use available nutrients, and over time will deplete soils of what is being offered. Rainfall and watering schedules can also cause nutrients to runoff, so it is important to pay attention to your soils to add what is needed for healthy vegetative growth.
Testing your soil is a simple process and provides a quick assessment of what you may need to add or amend for a more supportive soil environment. Hopefully, this guide and simple step by step visual is helpful in both explaining how to better understand your soils, and what you can do to make them better.
If you have any questions, please let us know below, and, as always, please share.