A garage heater is a very efficient way for you to keep this part of the house warm during the colder season. By choosing a natural gas heater, you can connect it to your home’s gas line, and thus have a money-saving way to keep your garage heated. While it takes a professional to connect the gas heater to the house’s central line, venting the heater is something that you do by yourself, on a sunny Saturday afternoon. Does this sound intimidating? No worries, installing a venting system for your heater is actually easier than it sounds.
What You’ll Need:

In this tutorial, we are going to provide you with two different methods of venting a garage heater. One of them can be done by cutting holes and installing ducts through the roof of the garage, while the other implies cutting holes through the wall and mounting the vent. The processes are very similar to one other, and you’ll need the same materials for both of them.
- Ducts & Vent Cap - You can’t buy the right ducts for your venting system without first measuring the length and diameter. The duct will need to fit in your heater flange. Also, you need to know how long the duct system has to be so that you can cover the full length from the heater and all the way to the outside of your garage, whether it’s through the roof or the wall. You will also need a cap for the external end of your venting system.
- Pencil - The pencil will help you draw the circles that indicate the exact size of the cut. Without it, you will have trouble knowing just how much to cut and could end up with a hole that’s either too large or too small for your duct to fit through it.
- Power Drill & Reciprocating Saw - With these two items, you will be able to make precise cuts for the holes of your venting system. Whether you plan on installing the ducts through the roof or cut holes in the wall of your garage, these will be very useful.
- Ladder - The ladder is only useful when you want to vent the heater through holes in the roof of the garage. It can also be useful for wall mounts, especially if these mounts are on the upper side of a tall garage.
- Metal Snips & Screwdriver - As you install the ducts that are required to vent the heater, you will have to fix them in place. Metal snips and a screwdriver will prove themselves useful in this process.
- Plumber’s Tape - Plumber’s tape is useful for mounting the ducts and holding them in place, but also provides a little bit of insulation. It’s especially useful for fixing the ducts on the rafters, so make sure you don’t start working without it.
Step-by-Step Instructions for Roof Vents:
One of the easier and most common methods of making sure that your garage heater can vent the exhaust gases from within the garage itself is to install a roof venting system. It’s true that often times, this procedure is best done by a professional, but the costs can be excruciating for people that are on a budget. The alternative is to make all the connections yourself, and the process itself isn’t all that complicated. In the following paragraphs, you’re going to learn the steps required to run a heater vent through the roof.
Step 1: Measuring the Duct

- To provide the proper venting for your garage heater, you will need a duct that matches the diameter of your heater’s flange. These dimensions should be specified on the original packaging of the heater. If you don’t have it, you can simply determine it by using a measuring tape.
- After knowing the diameter, it’s also important to determine the length of the duct you’ll need to create the vent. By using a measuring tape, you can determine the distance between the heater itself and the stop in the roof where the vent will be installed.
Step 2: Determining the Position
The next step requires drawing the outline for the hole that you’ll drill in your roof at the next step. What you’ll be doing now is figuring how to connect the vent to the unit and see where it goes in the roof.
- Grab a 90-degree duct elbow and place it on the vent flange of your garage heater. The other end of the duct should be positioned on the ceiling.
- With a pencil, draw a circle around the duct, to mark the insertion into the roof sheathing.
- Next, draw a larger circle around the first one, which should be about one or two inches bigger. This larger circle represents the clearing you need to insert the duct into the roof without any obstructions.
Step 3: Cutting the Holes

During this step, you will be required to use a power drill in order to make the pilot holes. These holes should be about ¼ or ½ inches and should be around the perimeter of the circle outline you drew at the second step of this tutorial.
- Once you have drilled these holes, grab the reciprocating saw and start making the actual cut. When this is done, you should be able to remove the roof sheathing and make a place for the duct. You will also have to remove the shingles that are located around the hole.
- Next, you will have to make a hole of the same diameter in the roof flashing.
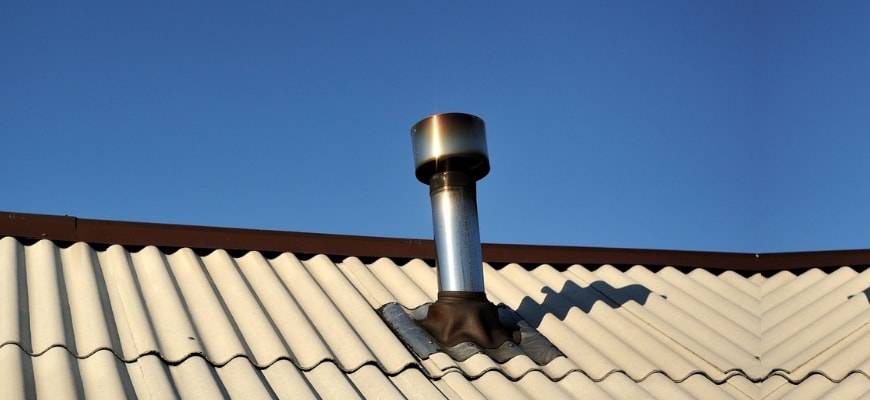
- Grab the upper flange and place it on the roof flashing located below the shingles that are above the hole, towards the roof peak.
Step 4: Inserting the External Piece

At this point, you will have to make sure that the duct runs straight, by aligning the hole in the roof with the one in the flashing. When you’re finished this, you will have to seam the patches.
- By standing below the hole in the roof, insert the longer portion of the duct through the hole, making sure that there are at least 24 inches of duct above the roof shingles.
- Take the vent cap and place it on the top end of the duct. You have to make sure that the screws are tight, so grab your screwdriver. This concludes your outside work, as the next steps will require working from inside the garage.
Step 5: Securing the Middle Piece

Now it’s time to measure the distance between the 90-degree elbow that’s connected to the heater and the duct portion that’s now suspended from the roof.
- Once you’ve measured this distance, add 16 extra inches to the given number.
- You will need to cut some plumber’s tape for this part. After having screwed one of its ends on the side of the rafter, tightly wrap it around the duct.
- Make sure that the duct’s bottom side is now aligned with the elbow coming out of the heater.
- After having done that, use a deck screw to secure the other side of the tape to the opposite after.
Step 6: Installing the Extra Pieces

If the middle duct piece connects the elbow and the duct suspended from the roof, this step can be skipped. However, they may be cases where an additional piece of duct is required, to connect whatever duct is now suspended to the elbow that goes inside the heater.
Step 7: Connecting the Elbow
The final step requires you to secure the elbow to the garage heater. You can use one-inch tapping screws to do so. Place them along the rim of the elbow, and the entire duct system should now be fully functional.
Step-by-Step Instructions for Wall Vents:
The alternative solution to installing a vent through the roof is through the wall. There are a lot of people that choose this method over the prior one, as this keeps their roof intact. You’ll need pretty much the same set of tools as those required to make a hole through the roof of your garage.
Step 1: Measuring the Distance

The first step in installing a venting system for your garage heater will always imply measuring the distance between the wall and the heater itself. People typically choose to install this vent on the wall that’s right behind the heater. What’s important here is to remember that when you place the elbow on the heater flange, the position needs to aim the top of the elbow at the wall where you’ll be making the cut.
Step 2: Tracing the Outline
Just as you would when inserting a duct through the roof, you are required to draw a circle that indicates the exact diameter of the vent. You will also need the secondary large circle, about two inches wider than the first one. This allows you to work will full clearance.
Step 3: Cutting the Wall
A drywall cutting knife should help you make a clean cut, but a reciprocating saw should do the trick as well. Make sure that you also cut the insulation behind the hole, all the way through the exterior of your garage.
Step 4: Inserting the Duct
Now you can easily insert the vent/duct through the hole you’ve just made on the wall and place the vent cap on the external end of the duct. After having done so, you can seal up the exterior portion that goes around the duct, to make sure no heat escapes the garage.
Note: Depending on where you live, you may need to comply with certain building regulations. These may require you to extend the outer option of the vent to a given number of inches further away from the wall.
Step 5: Mounting the Inside Duct System

All the remaining steps are identical to the ones required for installing the duct through the roof. The difference is that you’ll now have to work horizontally instead of vertically, so you might need some help in holding the duct fixed in place while you secure it at one end. You can either ask someone to help you or support the duct from falling on the floor by using furniture or object that can keep it aligned.
Conclusion
Venting your own garage heater isn’t a very complicated process, but people turn to specialists because they are about cutting holes through the roof themselves, or just don’t have the time to make this on their own. While it may seem intimidating at first, installing a venting system is just a matter of time and patience, and is by no means a complicated process.
You might want to consider going with the wall vent instead of the roof one, mostly because it will be easier for you to work by cutting a hole in the wall rather than by making one through the roof. However, the choice is ultimately yours. Just make sure you follow the building codes in your area when making such structural modification.