Transplanting, in horticulture, is removing a plant from its original place and moving it to another location. This is a typical process for gardeners who have to rearrange their plants to make space for new ones or move them from pots to the ground. When you remove your plant, it’s almost impossible not to hurt the roots when transplanting. That’s why you have to prune the roots a little. Pruning is the removal of the unwanted or diseased parts of a plant to increase the chances of better growth.
When pruning, you have to ensure that you don't cut off too much! Also, ensure that you don't damage the plant's root ball. That said, hydrangeas are some of the most beautiful shrubs you’ll find. They bloom flowers of various colors, and they are also used in herbal medicine. A hydrangea plant guide will help you learn more about these massive flower shrubs.
7 Tips For Transplanting Hydrangea
These tips are a little bit more than just tips; to be honest, they’re a guide to having your hydrangeas grow strong and healthy after transplanting.
1. Transplanting at the Right Time

Image Credit: jalexartis via Creative Commons
Timing is everything, and that is true in transplanting. Transplanting your hydrangea at the wrong time can be your first mistake ruining the process before it starts. So, when is the right time to transplant hydrangea? The answer is when it is dormant. Dormant means when all the leaves of your hydrangea have fallen off. This will start towards the end of fall, no pun intended, or early winter.
You can begin the process around December through February. Here is the primary reason why transplanting your hydrangeas when dormant is the best option. For one, hydrangeas are shrubs, and shrubs can get big, making your job that much more difficult. Trying to transplant a full bloom hydrangea will be a painstakingly difficult task!
2. Determining the Best Spot for Transplanting Your Hydrangea

Image Credit: USDAgov via Creative Commons
It’s no surprise in the action of transplanting that picking the right spot for your plant is critical, which leads to the question, what is the right place? First and foremost, the best depends on the reasoning for your relocation. Do you want your hydrangeas to be in an area they can be seen, or are you moving them to grow new plants in the original location? Whatever the reason, what is just important is the soil of the new site.
Soil is the base for your plant's growth, but we’re pretty sure you already know that. What you need to know is the kind of soil required for shrubbery. For shrubs, in particular, your soil needs to be well-drained, so avoid any clay or rocky soils and lean more towards the sand and loamy soils. Mix peat moss with the soil to improve its texture. The best way to ensure your plant receives the best possible nutrient is to carry out a soil test. You can either pick the best garden soil testers, carry out DIY soil tests with household items, or seek professional help.
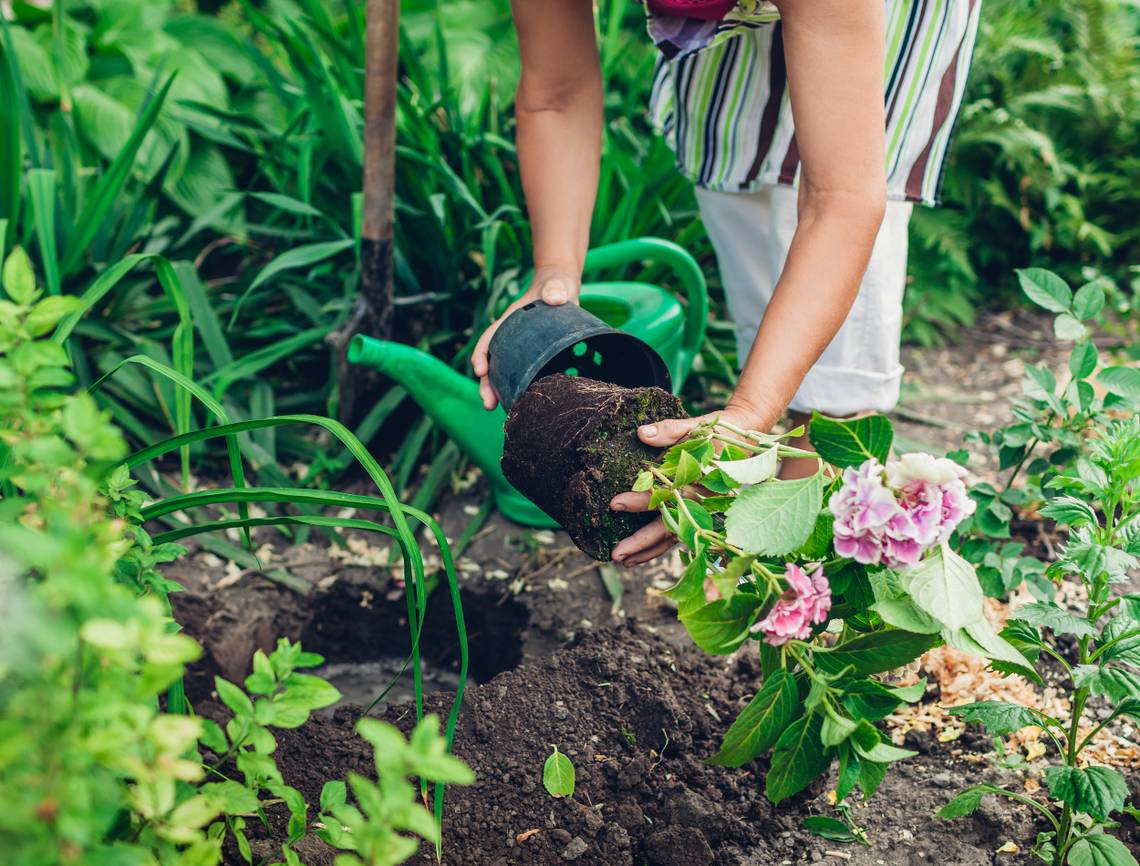
3. Dig Your Plant Carefully

Image Credit: woodleywonderworks via Creative Commons
The thought of digging your lovely plant up can be nerve-racking; that’s why it's important to do it the right way. First, determine the size of your plant. Hydrangeas are a nice size, so you’re going to want to be extra careful. Before you begin the digging process, make sure the plant is healthy and hydrated by watering it a few days before. Next, you'll want to prune your hydrangea. Then you dig around the base about at least three inches from the base. Using a spade shovel and making small digs is the best way to go about this process.
The goal is to keep the root ball intact. To understand the size of your plant's root ball to prevent accidental damage, measure the stem diameter six inches above the ground. The root ball will be approximately 10 to 12 inches for each inch of stem diameter. If your stem diameter is four inches, then the root ball is between 40 and 48 inches, i.e. 4 x 10=40 or 4 x 12=48.
4. Planting the Right Way

Image Credit: photofarmer via Creative Commons
Usually, there is a right way and wrong way to do things, which is true in transplanting too. When done incorrectly, you can kill many of your shrubs. First, get all the tools you’ll need, such as your watering hose, a tarp, and garden shovel. You’ll need soil that can be well-drained.
Once you dig out your plant carefully, place it on the tarp, then dig your new hole. When transplanting, ensure you have the right amount of space in width and length in your soil to secure room for growth. The entire process can take three to four hours, but it will be a beauty that will last a long time if done correctly.
5. Watering Your New Plant
In the transplant process, water plays a vital role. When you remove your plants from the ground, they need water. Once they’re planted in the ground, you’ll water them in intervals. For the first couple of days, your plants need very little water since they're busy adjusting to their new home. Watering too much immediately after the transplant will lead to plant shock.
As an example, if you used to add a glass of water to your plants before transplant, after transplant for the first couple of days, they need half a glass of water twice a day, provided that the soil drains well. Then, for the first two weeks, you’ll water them every day. In a three to the twelve-week window, water your plants every two to three days. You can water weekly after your twelve-week period to ensure your roots are established.
6. Adding Mulch to Your Hydrangea

Image Credit: Chris Alberti via Creative Commons
Mulch is just another factor that can significantly help the growth and health of the plant you’ll be transplanting. Not only does mulch help with hydrating your plant, but it also assists in establishing your roots. The amount of mulch you’ll need depends directly on the square feet of the area you plan on mulching.
From there, you have a mathematical guideline to help you out. Multiply your square footage by how deep you want your mulch. Expertise says your mulch should be two to four inches deep, then divide by 12. The number you come out to is the amount of mulch you need to buy in cubic feet. Here's everything you need to know about mulch.
7. Pruning Your Hydrangea

Image credits: anouchka via Canva
Hydrangea can get pretty big, so first, you want to snip them into a shape to make digging easier. Make selective cuts in your shrub to promote new growth in the places you want it to grow. Another way to encourage new growth on your shrub before transplanting is to cut off one-third of the old branches. Pruning can be an extensive process, but the results will be worthwhile. That said, don't prune your hydrangea in early spring.
In Summary
What remains now is to care for and maintain your hydrangea and keep a close watch on its health and growth for the next two summers. Hydrangea needs frequent watering during hot months, but if you see that the leaves of your shrub are wilting, but the soil looks moist, opt for misting instead of over-watering your plant. We hope that these tips will help you transplant your hydrangea the right way.
Happy gardening!